Methods of making noise* #
* Excluding traditional instruments. We’ll get there soon.
Samples #
A sample is exactly as the name implies- a ‘sample’ of audio. Sample is a pretty broad term though, so usually some more terms are applied to help categorize them. Still, for the generic term what is usually meant is a small audio file that contains one sound, like one drum hit or one piano key press.
These can either be samples made or collected for the sole purpose of use in later music (like hitting record, playing one drum hit, then stopping, to create a small drum sample) or a sample lifted (with often dubious legality) from another recording. It’s worth noting that fair use is really not something you can rely on here, but it’s also pretty common. #notlegaladvice
The next kind of sample worth looking at is a loop. These are longer and are usually, well, loopable - If you play them on repeat they typically sound continuous.
Often these will be of drums or guitar. The term ’loop’ can be used broadly for audio snippets of this length though, so not all loops, uh, loop. Usually when using a loop it’s best to do some mangling, swapping some beats or putting on destructive effects to transform it in some way. This prevents your audio from just sounding like layered tracks from another artist mashed together and is a good way to put creativity into what you make.
Another term you might hear is stems. Stems are just separate recordings of each part of a song - say the vocals as one audio file and the drums as another, these would make up the stems.
Samples are also, sort of confusingly, made of samples. But these words mean two different things in that sentence. The sample of sound as a whole is made up of a bunch of different points in a wave, usually captured thousand of times a second- whatever the sampling rate is (commonly 44.1, 48, or 96
This is particularly relevant to making music for multiple reasons:
- When change the speed/pitch by a non integer value, we have to ‘interpolate’ extra points into this. #math
- When we slow down or make a sample lower pitch there’s only so much data to use, at really low pitches the wave will start to sound sort of low-fi
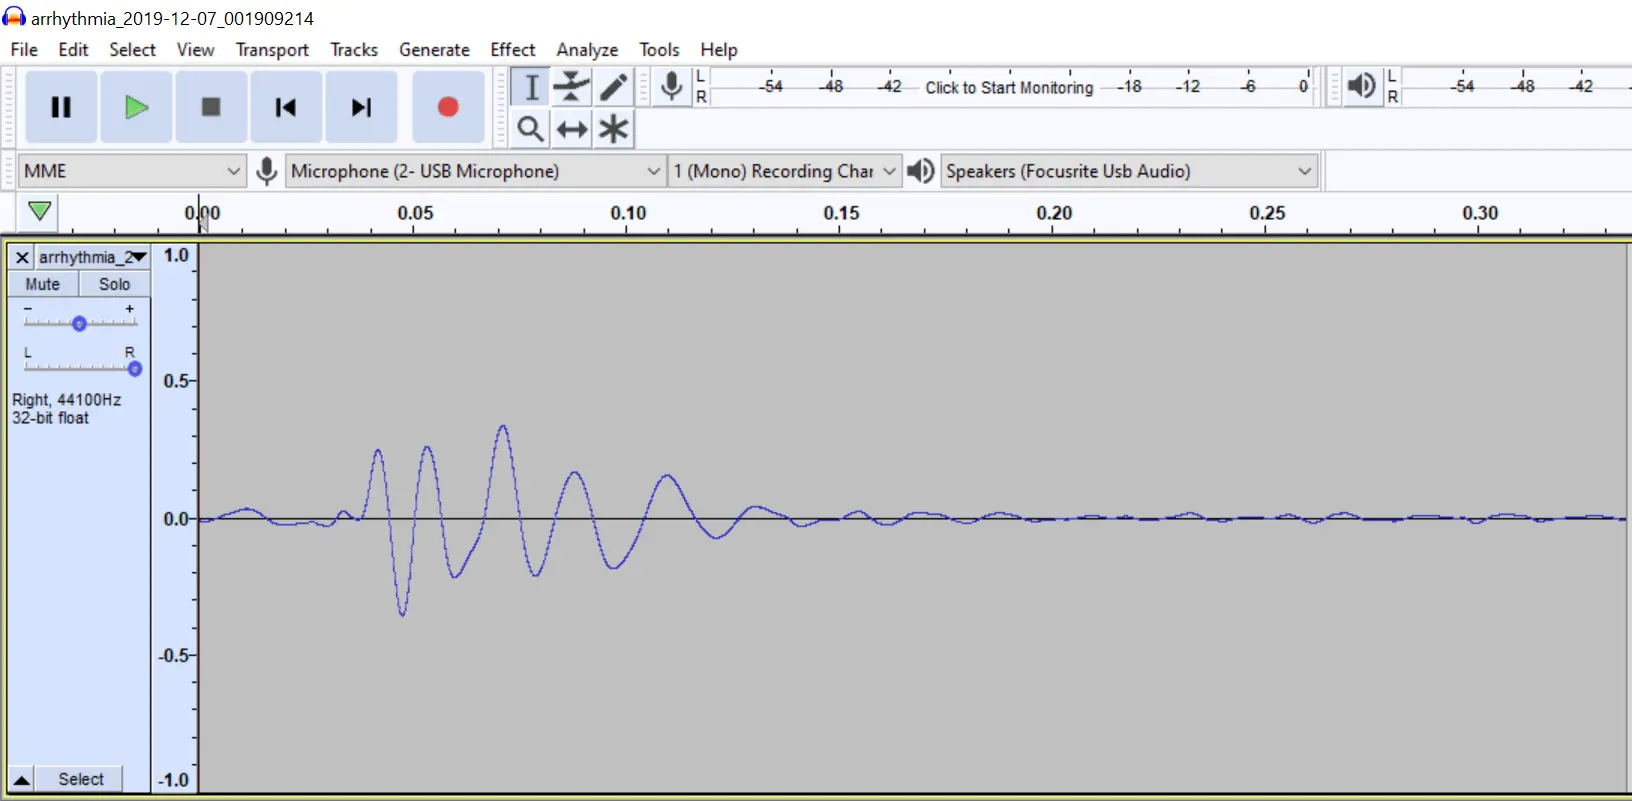
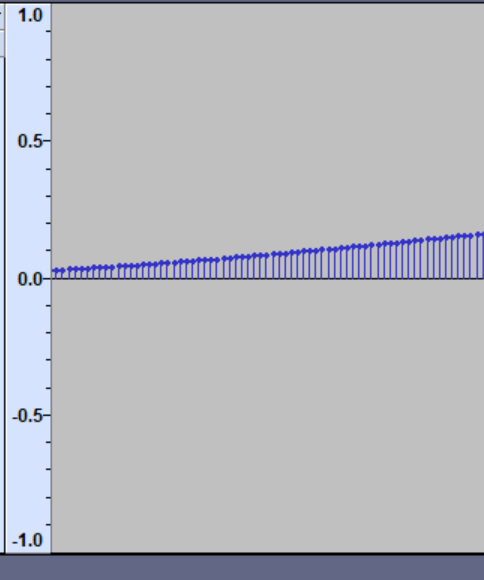
- When chopping a sample to start playback at any point, we want to chop at a 0-crossing to avoid a sharp transition (which equates to high pitch sound)
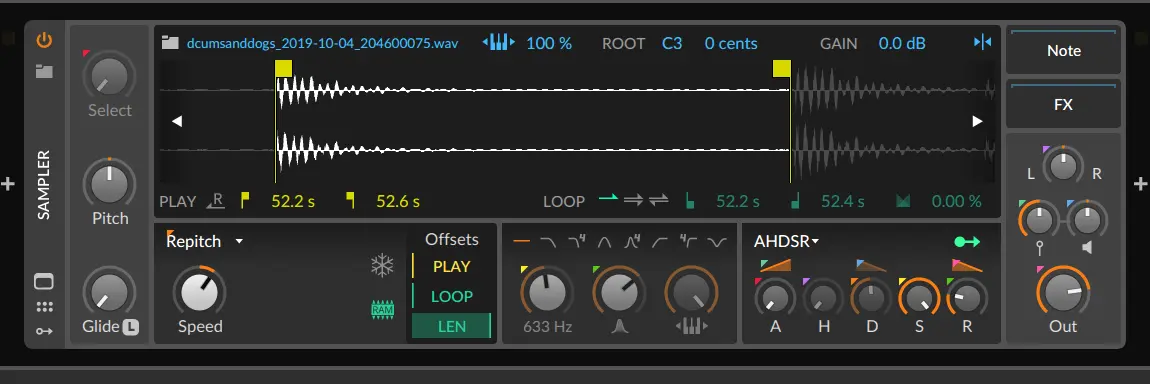
Here, we’re looking at the sampler device in Bitwig Studio, though most of this should be similar in other software. Starting with the obvious, the sample wave form in the middle. I have loaded a sample which has multiple drum sounds in it, but I’ve zoomed in on one sample and placed these yellow flags to denote the start an end points. Bitwig’s sampler, like many others, will try to snap these points to aforementioned zero crossings. You’ll also see next to the file name that the keyboard icon is blue and says 100% and next to that the root is set to C3. This means that if I play the C3 key on my keyboard it will play the sample as is, but if I play a different key it will slow playback down or speed playback up to match the pitch to the key I’m playing. Say I hit and record the A4 key on my piano- it’s nice to be able to correct for the pitch of the sample in the keyboard tracking - you want to tell the computer what note a sample contains.
Still in the same section of the window but below the first yellow flag that denotes the start, you’ll see two smaller yellow flag icons that have a time specified. These are the times in the sample where the start and end flags are placed.
Left of that you’ll also see an arrow with an R over it, that’s the button to tell it you want to play the sample in reverse. To the right, there’s some loop options. Right now it’s in ‘Single Shot’ mode. If the button to trigger the sample is held for longer than the length of the sample, it will still only play once. The other two options are a forward repeat, the equivilent of leaving a song on loop, and a ‘ping-pong’ loop, where the slice will play forwards then-backwards then forwards then …. as long as the gate is held.
I also want to mention the freeze ability in this sampler- the snowflake below the end-time indicator. When enabled sample playback has to be done manually - and new controls to do so become available. Think of it like a record that you have to spin yourself. This can lead to some really cool sounds.
Finally, you’ll see below that snowflake is a RAM indicator. When lit, the sample is stored in RAM, not on disk. In general, this is probably what you want. It might be helpful to do otherwise though if you’re either low on memory or you’re trying to load some absolutely massive samples.
Let’s sample! #
Talk is cheap, let’s actually put this to use. First, we’ll need some samples. To give us something fun to start with, go grab Glitch With Friends, Vol Ⅲ. (It’s free) - Note that it is a 7.23GB download, so if you’re on a slow connection it might take a hot minute. Once you have it downloaded, extract the .zip somewhere.
Now, we need something to play back samples. Let’s go grab both Simpliciter to play back samples in VCV Rack.

Unlike the bitwig sampler, this sampler, ‘Simpliciter’ in VCV Rack can take in live input to layer sounds or record the inital sample. In general you should see a lot of the same controls I talked about above exposed in this UI. There are some extra neat ones here though, including the ability to detect peaks as is enabled in the lower left in this screenshot. With this and a longer sample file with multiple drums you can just select the drum sample you want on each play-trigger.
Watch the above video from Omri Cohen, get a vibe of what Simpliciter can do. Then, go nuts. You know enough about how VCV works now that experimentation will be the best way to learn.
One thing I do want to stress is that this workflow of right clicking the module and digging trough your file system to find the right sound sucks. In a normal DAW - as mentioned on the last page - you won’t have this problem.
[TODO] Multisamples
https://github.com/verdog/renoise-hardware-sampler & SampleRobot
Field Recordings, Tape Loops, and other sampling goodness #
While you may not be able to do anything with the knowledge at the moment, I do want to note a few other things related to samples.
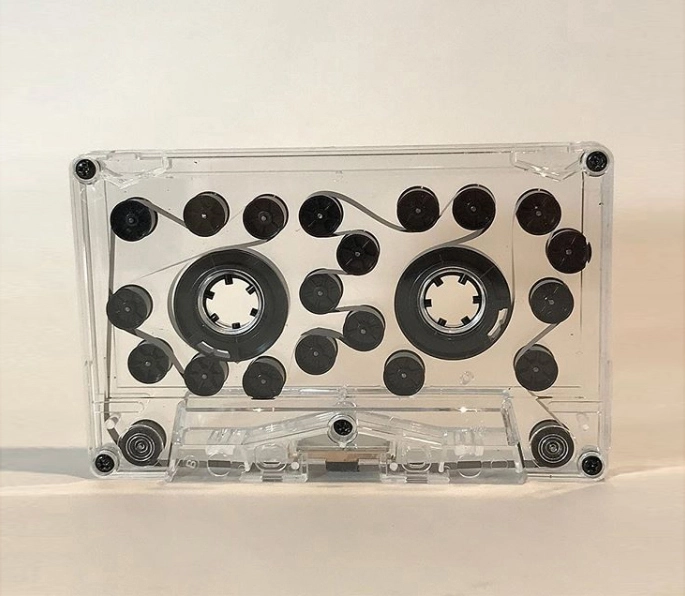
First, tape loops are a thing. These typically use normal cassette tapes but the tape on the inside has been replaced with a loop so that it’ll repeat. Because tape naturally degrades and can be pitch shifted by slowing down or speeding up the play back speed they can act as a neat physical implementation of the same techniques we use samples for. Similarly, they’ve inspired many techniques that are used for effects, such as the distortion/satuartion that comes with tape and the wobble that comes with an old motor.
See Tape Loops Are Dope (YouTube, Andrew Huang) for more on Tape Loops.
Another source of samples you may come across are field recordings. While these are really the same as samples like mentioned above, they’re often very long, including hours of content taken from nature or background noises in a city. Often these are used to add a subtle texture to a piece, everything from putting on a rainy day to a sci-fi cityscape. Recording good field recordings is an art in itself and is both fun and challenging. You can find plenty for free online or even nab this 1.6Tb pack (yes, terrabytes) for $20. I do recommend trying to record a few rainy days yourself though.
Basic Oscillators #
Generally there are a few kinds of oscillators you should know about, but first, what’s an oscillator?
Well, very simply, it’s a thing that oscillates- moves in a repeating pattern. Generally there are three ways you’ll hear Oscillators refereed to as being VCO, DCO, or LFO. You may also see Oscillators in general refereed to with the abbreviation osc. Unfortunately, that can be confusing because OSC can also mean Open Sound Control, something I’ll get into in the Sequencing and MIDI chapter in a bit.
As you’ve already seen, a VCO is a Voltage Controlled Oscillator. Back in VCV you saw these being emulated where each volt of constant input applied made the oscillator oscillates at twice the speed, one octave higher. In real life, VCOs tend to be a bit unstable and have minor pitch drift. While this may sound like a negative, it’s generally seen as a feature, as stacked, slightly out of tune oscillators sound really good. In fact, VCV Rack’s basic VCO, ‘VCO-1’, emulates this behavior by default.
A DCO is a Digitally Controlled Oscillator. These (usually) exhibit no pitch drift and are far easier to tune.
Note that some hardware may go from a digital input to a VCO internally, or take a voltage pitch signal as input but just sample it to use a DCO internally.
an LFO is a Low Frequency Oscillator, they can still be either digital or analog (DCO or VCO), but they typically have a max frequency of around a hundred hertz and are meant to be used to control other things, not make sound to hear directly.
Some oscillators, whether digital or analog, cover enough range to be either a ’normal’ oscillator used for sounds you’re intended to hear or an LFO, so there’s not always a clear distinction.
Analog? Digital?
Avoiding the complex explanation of what actually makes an oscilator analog or digital, here’s what you need to know:
Analog systems have some natural pitch drift and non-linearity (distortion), this makes them sound ‘warmer’
Most analog designs can handle audio-rate modulation by default, you’re not fighting a limited sample rate
Because Math, digital systems can only understand frequencies up to half their sample rate. This is how often a new sample (in the single ‘dot’ of the waveform sense) is taken. If you try to go over this frequency, they “alias”.
The audible ramification of this is sound not being reproduced at the right frequency. This is a problem because things like distortion add that flavor to a wave by adding more and more higher-pitched frequencies that are related to the original sound. If they try to add too many, they alias. This adds those unexpected frequencies which generally sound bad.
Audio rate modulation, that is doing something such having a 5khz sine wave change the frequency of another sine wave at, say, 4khz, generates a ton of these same distortions. In an analog system, there in no sample rate so this isn’t a problem.
If this doesn’t make sense right now, that’s okay. We’ll se more on it later.
If you record at very high bit depth / rate or direct to analog media (tape), it’s relevent to not have the computational overhead on the sources, so analog oscilators help with that.
Analog is low latency: a digital source/effect will incur latency due to the necessity of a sample buffer.
Almost everything that uses sound digitally will work on a group of samples at a time as it is significantly easier on the computer to do so. Unfortunately, this means you’ll have a delay of how long it takes to collect that many samples at that sample rate. For example, if you’re sampling at 48kHz and you have a buffer size of 512, you’ll end up with 48,000/512 = .0106 seconds = 10.6 milliseconds of delay. for context, 10 milliseconds is right on the edge of the limit of time between plucking a string on a guitar and hearing the result though an amp that most guitarist find comfortable to play it.
This also means analog systems are great for feedback patching
For example, in VCV you can take the output of a VCO and plug it into it’s own FM input! Try it!
Digital (DSP) oscilators can get complexity and polyphony for cheaper, so they’re good for really complex timbres, for example with wavetables, which I’ll cover in a bit
So, which is better? Neither! If you want to go all analog or all digital, that’s cool, but both have their strengths and weaknesses. But going analog means using physical hardware, which is usually very expensive.
Of note, you’ll often hear people call non voltage controlled oscillators VCO’s anyway. ╮(─▽─)╭
Oscillators usually have very simple wave shapes as outputs. Typically, you’ll see Sine ∿ , Triangle ʌ , Square ⎍ , and Saw waves as outputs. You may see other, more exotic wave forms though.

Often, the square wave output has PWM or ‘Pulse Width Modulation’ control:
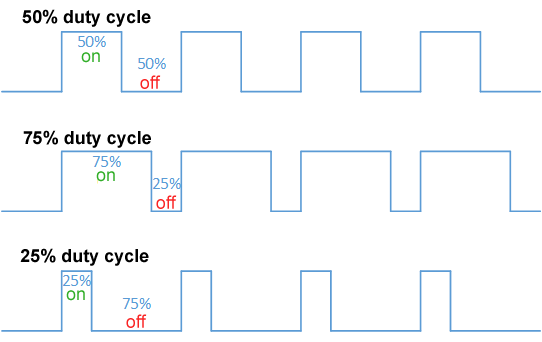
Varying the pulse width over time sounds really good, though you should already know this because this is exactly what we setup a few pages ago!
Some oscillators will also have Sync, either Hard or Soft. Sync, in general, makes the waveform reset once it gets an input from another oscillator. This means you’ll need two oscillators to do sync.
Oscillator sync is a feature in some synthesizers with two or more VCOs, DCOs, or “virtual” oscillators. As one oscillator finishes a cycle, it resets the period of another oscillator, forcing the latter to have the same base frequency.
[For Hard Sync] If the [following oscillator] is tuned to a lower frequency than the [controlling oscillator] it will be forced to repeat before it completes an entire cycle, and if it is tuned to a higher frequency it will be forced to repeat partway through a second or third cycle.
[…] There are several other kinds of sync which may also be called Soft Sync.
Reversing Sync
This form of oscillator sync is less common. This form is very similar to Hard Sync, with one small difference. In Reversing Soft Sync, rather than resetting to zero, the wave is inverted; that is, its direction is reversed. Reversing Soft Sync is more associated with analog triangle core oscillators than analog sawtooth core oscillators.
Threshold or Weak Sync
Several kinds of Soft Sync use comparison thresholds:
- Hard Sync which is disabled when the frequency or amplitude of the slave crosses a user-defined threshold.
- Hard Sync which is disabled when the frequency of the [following oscillator] extends too high above or too far below the frequency of the [leading oscillator].
- Hard Sync which is disabled when the frequency of the [following oscillator] is lower than the frequency of the [leading oscillator].
Soft Sync may accurately refer to any of these, depending on the synthesizer or manufacturer in question.
Phase Advance ‘Sync’
The phase of the slave is advanced by some amount when the [leading] oscillator level crosses some threshold. Used for audio synthesis, this may give an audible effect similar to Soft Sync.
Reset Inhibit Sync
When the [leading] oscillator crosses some threshold, the normal reset of the [following oscillator] is disabled: it will stick at its final level, positive or negative. When the [leader] crosses back over some threshold, the [following oscillator] is reset.
Overlap Sync
In this method, the current wave completes but a new waveform is generated at the sync pulse. The tail of the old wave and the new wave are output summed if they overlap.
- Wikipeda
I’d also like to briefly mention oscillator cores. Especially in VCOs, knowing what the ‘core’ of an oscillator is can make a difference. The core is simply the waveform from which the other waveform are derived. Generally, there are three kinds you’ll see (though others are possible): Triangle, Saw, and Trapezoid core. To get an idea of what a core is, lets look at the saw.
You can think of making a saw wave as just progressively counting higher with time. So, at t=0, we start at 0, at t=1 we go to 1, etc. until at, let’s say t=10, we reset back to 0, and count back up to 10. If we assume this process is continuous, that is we could look at any decimal, like at t=1.12 the wave is at 1.12, we’ve generated a sawtooth wave. This is our core. Now, we can say whenever that ‘core’ wave is less than 5, output 0 on the square output. If it’s greater than 5, output 10. If the blue wave is that core oscillator, the pink wave is the result (ignore the awkward spikes at the transition points)

The core used will often change the features of the oscillator. Generally, saw core oscillators are the cheapest and most common but also the least capable. Triangle and trapezoid cores often offer extra features, such as outputs other than the common sine, tri, saw, square.
Finally, I’d like to bring up harmonics.
The really dumb version: If the wave has quick transitions (cliffs, ridges, etc) it’s going to be more harmonically rich, and therefore have more ‘sonic content’ above the base frequency. For example, say you play a 440hz sine wave. It will have no harmonics, it will be a pure, 440hz tone. But, if you play a 440hz square wave? That’ll have a ton of harmonics, actually, by definition, it will have odd harmonics. If you care about the mathy stuff you can read
![]() An Interactive Introduction to Fourier Transforms by Jez Swanson
But, the relevant bit for musical stuff is that these harmonics, the phase relationship between them, and how they change over time is what makes a sound like that sound. It’s what makes a piano sound like a piano, etc - This is what I called “Flavor” on the first page.
An Interactive Introduction to Fourier Transforms by Jez Swanson
But, the relevant bit for musical stuff is that these harmonics, the phase relationship between them, and how they change over time is what makes a sound like that sound. It’s what makes a piano sound like a piano, etc - This is what I called “Flavor” on the first page.
Anyway, knowing what these harmonics add to a sound make a big difference. Often with synths, you’ll find you have separate control or outputs of the even and odd harmonics. This is sort of what you expect.
For example, say we have a 100hz ‘base’ sound. Then the even harmonics would be 200, 400, 600, 800, etc. Odd harmonics will be at 300, 500, 700, etc. Note that humans can only hear up to 20,000 hertz anyway, so, technically it’s impossible for you to hear a true square wave (Well, technically a true square wave would have infinite energy, so it’s impossible for more than one reason).
I’ll spare you going any deeper into terminology like the difference between harmonics and overtones, but, and here’s the important parts:
- Even harmonics have the perfect octaves and 5th, while odd harmonics have 3rds- which turns into dominant seventh chords
- We’ll hit music theory later, but generally 5ths are thought to sound happy, albeit a bit bland while 7ths are dissonant and so carry a lot more emotional weight. This in turn means that even harmonics tend to sound more pleasing while odd harmonics are a lot grittier and in your face.
- If you add in a lower harmonic (say you have a sub-octave pedal on your guitar) your brain will (usually) perceive the note as being the new, lower note. That is, or brains tend to use the lowest frequency in a sound to assign it a note on the keyboard.
- Distortion is literally just adding harmonics to the sound, clipping a sine wave (a form of distortion) is a really easy way to see this
Check this video out for a nice introduction to this that you can actually hear:
Additive and Subtractive Synthesis #
When using oscillators, you usually will want to sculpt your sound a bit more beyond the basic waves. While there are many, many, many ways to do this the most basic two are additive and subtractive synthesis (Though more often not you’ll usually use both together).
The easier to understand but harder to master is additive. Basically, you can just use a whole pile of oscillators together and sum up (mix) their outputs to get a different sound. If you do this with a different envelope on each oscillator’s volume and frequency you can basically make any sound imaginable, with enough effort. Usually you’ll mix simple oscillators, often even just sine waves.
Subtractive synthesis on the other hand works by starting with a complex wave and filtering out some of the sound. The key word these is filtering. Filters are something we’ll talk about more later, but the gist is they can be used to alter the flavor of a wave. The most common types of filters are the Low Pass Filter (LPF) and High Pass Filter (HPF). Each does what it sounds like. If you use a LPF you can remove some of the higher frequencies in wave. If you use a HPF, you can remove some of the lower frequencies. At the extremes with either type you can filter out everything, making the sound silent. You could also end up right against that threshold and getting any sound into just a sine wave.
Go ahead and setup the same thing in VCV Rack (Note, the above .gif uses an old version, but the connections should be the same) but also hook it up to the audio output so you can hear what each knob does. Most notably, the RES knob which will change the peak at the cutoff point. This will make a lot more sense when you actually try it.
If you want a gentle intro, check out this 3 part video series (Of which only the first in embedded directly below.)
To learn more about Additive Synthesis, I really recommend Additive Synthesis Magical Mystery Tour (Loopop, YouTube).
WAVETABLES #
There’s more to life than Sines, Saws, Tris, and Squares. Welcome to the future, Baby! We’ve got WAVETABLES.
VCV has a built in wavetable VCO that is preloaded with a table that will let you morph between each of the waveforms you’ve seen repeatedly now, but much more interesting is you can load custom wave tables. Let’s go grab some https://waveeditonline.com - just go to the bottom of the page and click “ Download all WAV at once (ZIP file)” … or click this link directly.
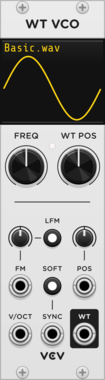
Once that’s downloaded, extract it. In VCV load the WT VCO module. Hook it up like you would the a VCO from the prior pages.
Right click it and select Load Wavetable and select one of the files in the folder you extracted. I like “KYMA_PAR.WAV”, if you can’t decide. When it’s loaded, right click the module again and change Wave Points to 256. All of the files you just downloaded should use this same 256 setting.
Now try adjusting the WT POS knob. If you want, try to build up a bigger patch with these wave table modules and the other modules you’ve tried so far.
If you need some inspiration, try duplicating the WT VCO module, hooking up the second one to the RIGHT input on the AUDIO module and using two different LFO modules into the POS inputs on each WT VCO - make sure to turn up the small knob above each POS input so the LFOs have some effect.
To learn more about Wavetables, I suggest watching the video below. It uses a paid software synthesizer, but there are plenty of free wavetable based synthesizers we can dive into later after we get a DAW setup.
Note, that not all wavetable synths have the linear FM (discussed in the next section), Phase mod / distortion, and wavefolding that pigments - the synth in that video - has, though many do.
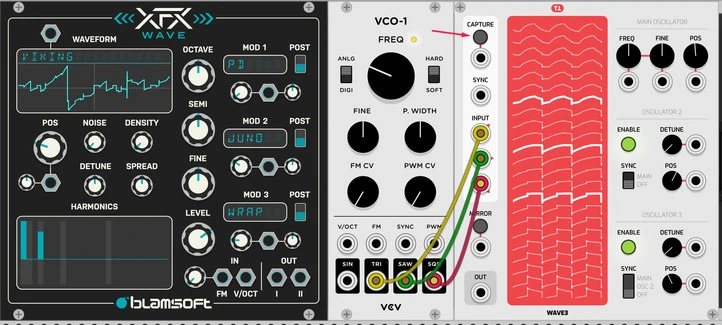
I really recommend using Blamsoft’s XFX-Wave for VCV Rack for more advanced wave table synthesis. It doesn’t let you load your own waves, but it has really good ones built in. Also in VCV Rack, Tiny Tricks Wave is a neat way to experiment with recording your own tables- just hook up three signals and press ‘capture’.
You may also hear about XFer Serum, it’s the sort of EDM/Dubstep standard synth, and is a powerhouse for wavetables. It’s incredibly popular, so there’s a ton of great wavetable packs for it too (I particularly like the Coda pack). Because Serum is so popular, it’s wavetable format is supported by most other wavetable synths as well, so if you’re jonesn’ for more wavetables, looking up free packs for serum can be a good place to start.
Serum is pretty expensive though, so you may want to check out VITAL (which TBH I think is a bit better anyway)
There are of course, many, many other Wavetable synths out there, but I can’t mention all of them. If you do want to check out more though, I recommend looking into Phase Plant (VST), Argon8 (Standalone Synth), Piston Honda MKⅢ (Eurorack), Plaits & Braids (Eurorack or VCV), Cursus Iteritas (Eurorack or Reason), and the Hydrasynth (Desktop).
FM Synthesis #
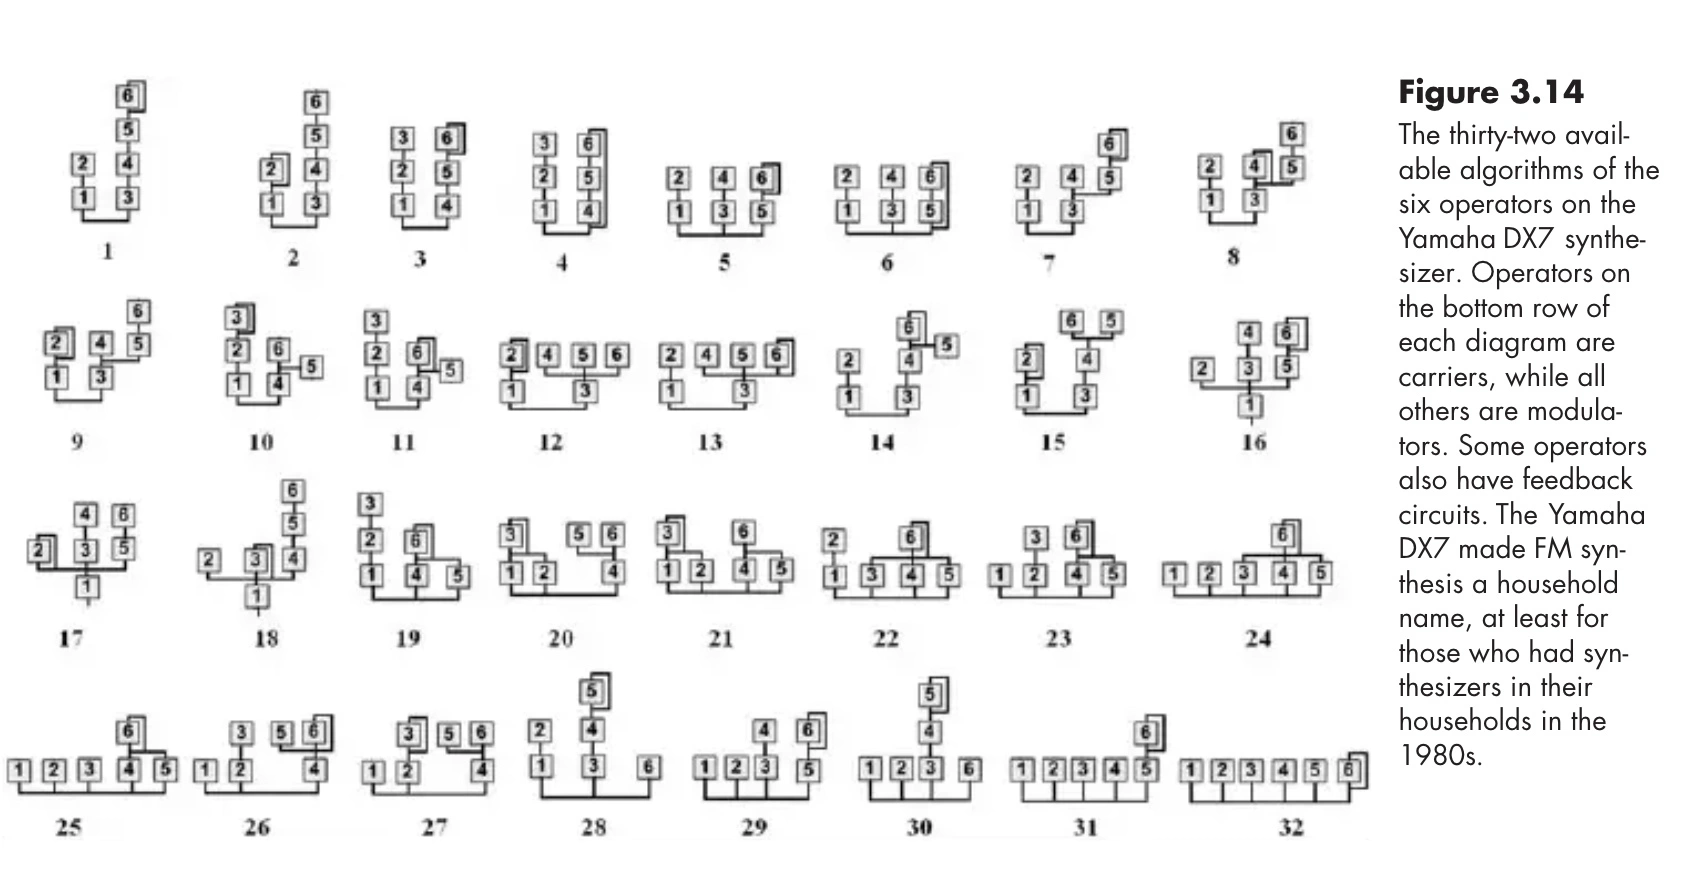
Source (Likely originally from the Yahmaha DX7 Manual)
Frequency Modulation or FM, is just the simply when you let the output of one oscillator modulate the frequency of another oscillator. Usually this is done in simple ratios and, ideals, uses linear, through zero modulation.
First, Let’s start with linear vs exponential FM. It’s worth noting again that most pitch tracking is exponential since our music system itself is inherently exponential (each octave is a doubling, that is the frequency between C5 and C4 is twice the frequency between C3 and C4).
This causes a problem though, if we modulate with exponential FM, say with a sine wave that is +/- 1V (2Vpp) and we start with an A4 at 440hz, then we’ll swing up to 880hz and down to 220hz. Fine right? Not so much. If this modulation is meant to simply give us a more harmonically interesting A as we mix in different octaves that won’t be the effect, as now we’re (to oversimplify) at 880hz half the time and 220hz half the time, and if we average those, \(\frac{880+220}{2}\) , then we don’t still get the original A 440hz but rather we get 550Hz, so, we’ve detuned by a heck of a lot. That’s an entirely different note.
Linear FM won’t follow the V/Oct standard (though some may use the Hz/V standard) but will keep you in tune as you modulate. This, however, begins to pose a more interesting problem. Imagine you want to modulate a 100hz signal by +/- 200hz. Clearly, that would mean going as high as 300hz, but what happens when we get past the first half of that negative signal and hit 0hz? Well, this is where having a Though Zero FM (TZFM) capability comes in handy, as this issue is solved sonically by actually inverting the phase of the signal when crossing the 0Hz point. While this may seem an odd solution, it does produce sounds that line up with what our ears expect.
Exponential FM and V/Oct, assuming the same scaling, are the same thing though so sometimes you can actually view it more as a second V/Oct input. For example, you could use the Exp FM input to specify the note, and then the normal V/Oct input to change the octave. Note though that this may not always work as the Exp FM input may be AC coupled, meaning that DC (nearly constant) values, like note data, will not be able to get through and instead you’ll just hear a “ping” as the pitch is modulated at the cutoff of the AC coupling filter, in these cases the Exp FM input will have a minimum frequency that the input signal can oscillate at to perform properly.
When talking about Linear FM, I mentioned that simple ratios are best. This isn’t entirely true, but they will produce the least complicated harmonics, and while complicated harmonics are awesome it’s also really easy to make something that sounds awful.
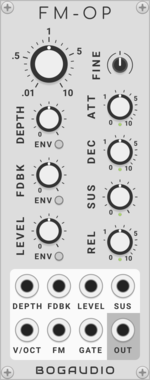
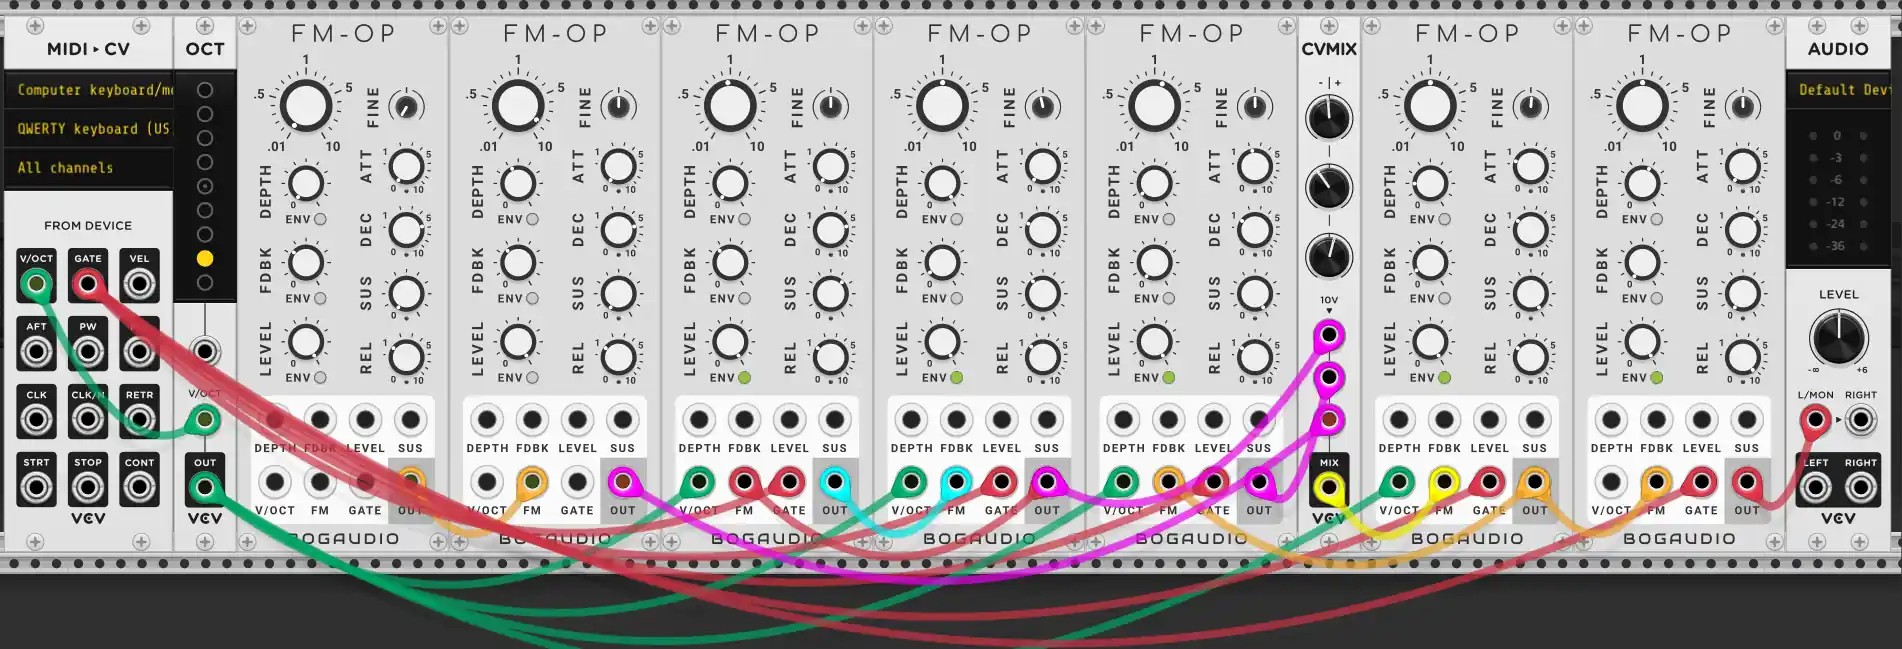
If you want to try this in VCV, you can start with the WT VCO we just used. It has an FM input with a button next to it to enable Linear FM instead. Chain a few together, see what sounds you can get out. Because it’s really hard to precisely set the frequency on the WT VCO you’ll probably only get mostly garbage. I’d recommend grabbing FM-OP from the VCV library.
Just drop two of them down, route the OUT from the one on the right into the FM of the other, take the OUT of the left one to your audio interface, and turn up the DEPTH knob on the first one. From there, you can start to tweak the big frequency ratio knob and the level knob. Try adding even more of the module into a longer chain and using CV MIX (Which you should already have) to sum some of them together to feed one. Play around. You may want to hook up a MIDI ▶ CV Module’s V/OCT and GATE outputs to each FM-OP - just remember to set the MIDI ▶ CV module to use your computer keyboard as input to get it working.
Phase Distortion #
[TODO]
Granular Synthesis #
There are many, many granular synths and effects, but, I’d like to start with a video review from Loopop of the Tasty Chips GR-1, as I think the hardware does a good job of showing what’s going on and Loopop does a great job explaining as well:
This video from Red Means Recording goes over a ton of VSTS that do this well.
Finally, I want to mention Arbhar, Morphagene, and Clouds- but rather than try to poorly explain the three I’m going to link videos again. Note that ‘Simpliciter’, the sampler I mentioned earlier is pretty similar to Morphagene and that Clouds is available in VCV rack.
Feedback #

Phase Distortion #
Physical Modeling & Karplus Strong #
+ Waveguides
Noise? #
Colored Noise, using it to make drums, etc