Chapter 5 - Working on how we work #
The Terminal | #
In the world of programming, embedded development, and electrical debugging you will inevitably need to understand how to use a terminal/command line at some point. While the text only interface can look intimidating, it has some clear advantages. Namely it’s significantly faster to use the cli or ‘command line interface’ version of many tools. Because of the nature of this guide you will be using the terminal frequently, so for convince sake a large amount of information on using it effectively has been moved to Appendix A, I highly recommend you read though it after you finish this page.
Take particular care to get used to the navigation shortcuts, such as ctrl+←/→ and tab completion.
I can not recommend getting autojump (or something equivalent) setup early strongly enough, as it makes navigating around the terminal much faster.
A bumpy road #
With that out of the way, I want to preface this chapter with a big warning: Getting used to everything we’re about to do will be a pretty big leap. There’s a good chance you’ve never used a computer that works in a way like we’re going to be setting up.
You might, rightfully, be asking
Then why would I do any of this?
To which there’s only one answer:
GOTTA GO FAST #
While there’s about a billion skills that are relevant being good at using a computer, programming, etc. chief among them is being able to get what is in your head into the computer and get stuff from the computer into your head as quickly as possible. Because of this, you need to make the interface as fast as possible. Generally, this comes down to making your keyboard be the ultimate data input and navigation weapon. How can you do this?
- Knowing shortcuts
- Using tools with even more shortcuts
- Typing fast
The enemy of input speed is your mouse. This may sound counter intuitive given how quickly and accurately you’re probably capable of whipping your mouse around your screen, but then think about just how much using on on screen keyboard with a mouse is!
Almost all of my suggestions about gaining this speed and improving the bandwidth between your brain and your computer come down to using your mouse as little as possible.
A quick reminder for those following along with this guide, #
How do I install packages on Arch again?
If you’ve been following along with this guide, you should now have a functional Arch Linux setup; however, it may have been some time since you did those steps, so as quick reminder for how to install programs:
-
yayfollowed by the name or description of a package you want will help you find most packages.- For example, running
yay i3 wmwill come up with multiple numbered results.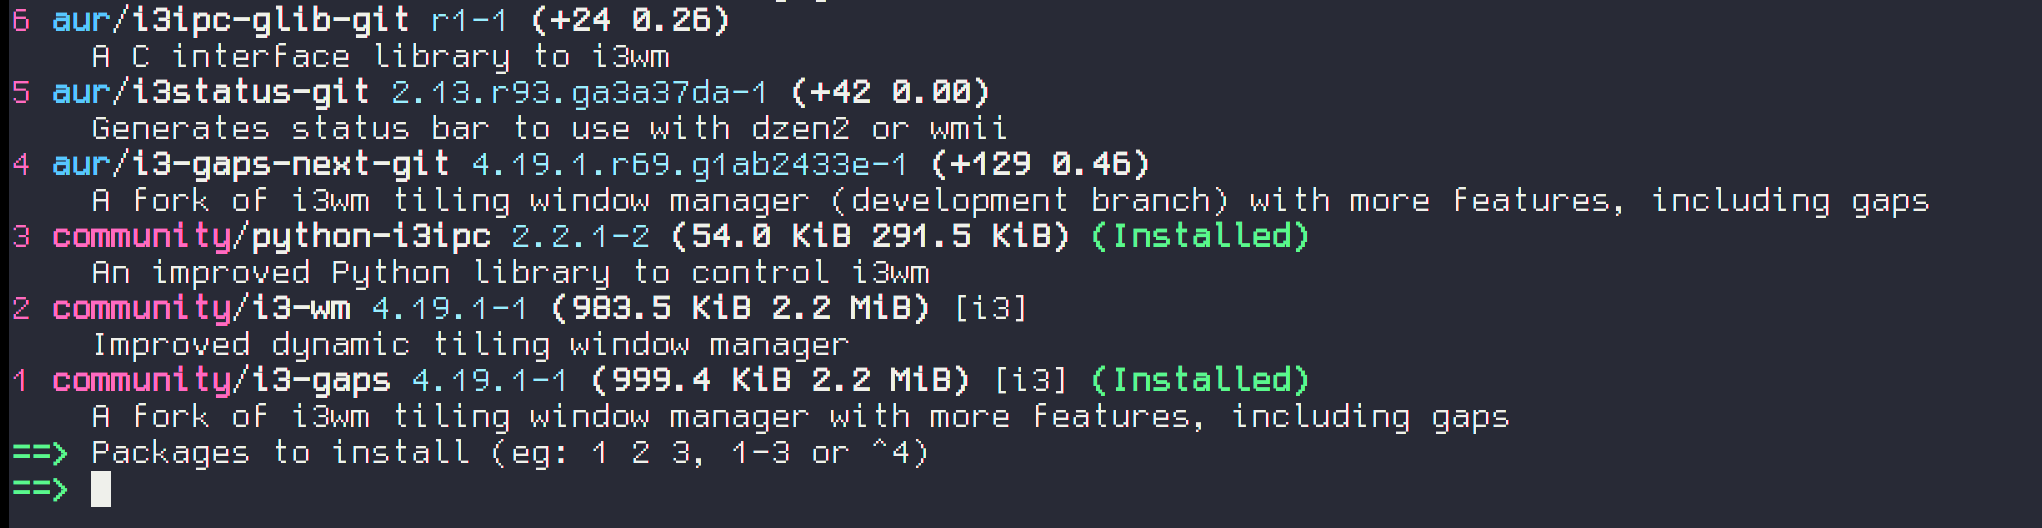 Here I could type 2 followed by pressing enter to install i3-wm.
- Whenever possible, you should prefer packages in core, community, or extra. (or any other repositories you’ve added to your
/etc/pacman.conffile) over the AUR, as packages in the AUR are maintained to a slightly lesser standard and are often a bit more annoying to update.- The AUR is still much better than trying to download a package from some random webpage.
- Keep in mind
yayis a wrapper forpacmanand can download AUR packages (pacmanitself can’t), but you can always still usepacmandirectly.yaywill callsudofor you internally to request your password,pacmanrequires it up front, so to do most operations you’ll actually need to usesudo pacman.
- Whenever possible, you should prefer packages in core, community, or extra. (or any other repositories you’ve added to your
- For example, running
-
To update, just run
yay -
pacman -F name-of-program-herewill let you know what package provides what program.- For example
pacman -F lsblkwill tell me that thelsblkcommand comes from theutil-linuxpackage.
- For example
-
sudo pacman -R name-of-packagewill let you remove a package/program.
For more info, read the ArchWiki page on Pacman and the AUR.
Keyboard driven applications #
The most obvious thing to make more keyboard driven is your web browser. You can go all in on this with something like nyxt but unless you really want to have a bad time with compatibility, I wouldn’t actually advise that. Instead knowing normal browser shortcuts (ctrl+t to open a tab, ctrl+ shift+t to restore the last closed tab, ctrl+w to close a tab, etc.), using a browser with a command pallet (like Vivalid’s Quick command - but bind it to a good shortcut) and setting up vimium is a much better bet. Once you get used to it you’ll wonder how you lived without it.
Code editors #
People get defensive about the way they work, and frequently try to claim the way they work is the best way. I of course know that my way is the best 😉. Really though, it’s mostly a matter of settling down into a good workflow and getting very fast with it.
I have three recommendations for code editors, as silly as that may seem.
The first two are terminal based nano and vim
nano, is the most simplistic of all the editors I’ll list here. It’s stupid simple to use and for quick just opening a text file and changing one line, probably the fastest. It clearly prints it’s instructions at the bottom of the terminal:

where ^ is the ctrl key, and M the alt key. However, you’ll quickly find nano rather limiting. You’ll still probably need to use it when you’re stuck with only having command line access though. That brings me to my second recommendation, vim (or ox). Unfortunately, vim is notoriously difficult to use, to the point that trying to exit vim is a bit of a joke (it’s esc→:wq) this tutorial is pretty good though, and if you want you can get some really nice extensions for vim, or full on plugin packs, like spcaevim.
Of course, you probably don’t want to always use a terminal-based text editor (though you should be able to when you have to) so what’s good graphically?
Despite it being a Microsoft thing, I really recommend Visual Studio Code. It’s slowly becoming the default for development for many languages and for good reason. It’s fast, extensible, and very configurable. Plus if you put in the time to learn the short cuts, nicely keyboard driven. If you’re not okay with Microsoft living in your editor, you can grab vscodium instead.
While VSCode is nice, it’s still rather different from the Integrated Development Environments (IDE) that have been common for many years. I recommend you try out a few IDEs, especially if for some unholy reason you want to write in Java. It’s relatively common to be stuck in some specialty IDE for a given processor if you get into embedded development.
There are of course a ton of other options, Emacs, Eclipse, Clion, PyCharm, etc… If what I recommended doesn’t suit you, feel free to look into these. Regardless, a text editor should be pretty high up on your list of things to get setup, as it will make the latter steps much easier. I can’t stress enough how important it is that you learn your text editor well though, as mentioned in 10.4 - Getting to know our tools
Alright, some disclosure. I don’t really use Vim. I only use nano and VSCode. This is because if I really need to edit something in a CLI (so on a remote server or when first getting a system running) it’s almost always the case that it’s either a quick n’ dirty config file edit that nano is fine for or something complicated enough to justify the annoyance of bringing the file off the server, using VSCode, then uploading it again. Often, I don’t even need to do that though, as I’m able to edit the file in VSCode using VSCode’s Remote Development plugin or just connecting with sshfs. That said, I did still learn vim well enough that I can use it if it is the only editor available, and do still recommend learning it as in a lot of professional contexts the servers will not have these modern conveniences.
The Desktop Environment #
This is the biggest change, I’m going to recommend switching from KDE, which we installed when we setup arch, to i3-wm. i3 is a tiling window manager, this means it looks something like this:
This is a screenshot of i3-wm with 4 windows open: two instances of Typora (the program I’m writing this in), and a file manager (Thunar), a terminal (deepin-terminal-gtk) running ncmpcpp which is what I use for music. The Typora windows are being tabbed by i3 (it’s a bit hard to see, but there’s two big tabs at the top of the Window). What’s cool about i3 is how it will always use space as efficiently as possible by tiling the windows, and you can navigate between the windows (or multiple monitors) entirely by keyboard (mouse still works obviously) and open multiple virtual workspaces. When programming and using a computer for advanced things it’s not uncommon to have a dozen windows open and having things organized like this can be a life saver. Plus, as I showed with the typora tabs, programs can also be tabbed instead of tiled, so I could have one tab of firefox, one of typora, and one of a terminal, so they’re all still maximized but I can get between them quickly, and these tabs can be mixed with the tiles, as in that screenshot.
Alright, so i3-wm is great, right? Well yes, but…
i3, when first installed, is very, very minimal, it will greet you with a plain black bar and clicking with either mouse button anywhere will do nothing. You should, however, be able to open a terminal by using your modkey (probably the windows or alt key) and enter.
i3 actually comes in a bunch of separate parts, the most important of which are the window manager itself, the status bar, and the task runner.
The window manager is the thing that actually manages the windows, this is the part most people are referring to when talking about i3 (assuming they’re not talking about an i3 Intel CPU) and is sometimes refereed to as i3wm. A very popular ‘fork’ of i3 is i3-gaps which is available in the community repository. It just addes slight gaps at the edge of the screen and between tiled applications for visual clarity. You can customize these gaps to be how ever big or small you want.
On top of the raw window manager you’ll probably want a status bar of some kind. While the default i3bar which is included with the i3-gaps package is fine when paired with i3status, it does leave a bit to be desired. Many other options are available. I personally use polybar though I have friends that have used lemonbar or i3blocks.
Finally you’ll want a runner/application launcher. While i3-demu is the default, I find it rather annoying to use, and much prefer rofi – this is much better explained here than I can briefly: https://github.com/davatorium/rofi
To further make i3 reasonable to use you’ll want a few more things:
picom is a composite manager. This is used to allow application to have some transparency, prevent screen tearing, and does slight effects, like a shadow behind windows. (You may also see this referred to as Compton, picom is the replacement for Compton)
lxappearance-gtk3 can be used to set the theme used by various graphical applications. I use Sweet but there are nearly endless options
For setting the wallpaper (which you probably wont see much) you can use nitrogen or feh.
if you have multiple monitors before setting the wallpaper though you’ll probably want to arrange your monitors correctly, for this you can use xrandr , read the man page for more information. You can add the command you use to set up your displays to your i3 config file to apply them at each reboot. If you’re having issuse with xrandr you may want to use arandr to make the initial config file.
/etc/environment file.
|
|
You’ll be needing quite a few different utilities beyond this. for a terminal I highly recommend kitty, rxvt-unicode, or Alacritty, though I actually use deepin-terminal-gtk.
For fonts you’ll certainly have your own tastes, but I really like Droid Sans Mono, which is in ttf-droid, but ttf-hack and otf-fira-code are pretty cool too. I also recommend installing noto-fonts, noto-fonts-extra, and ttf-font-awesome. The noto packages will provide coverage for weird characters and font awesome is basically icons saved as a font, and many open source projects use it. You’ll also probably want nerd-fonts-complete which is in the AUR.
Actually configuring i3, polybar, etc. #
Alright, so I just spit a lot of information at you, let’s put some of it to use.
The first thing we need to do is get everything installed. If you followed the install guide in Chapter 2, you should have either installed ssdm and kde or lightdm and mate. I had you start with those because they’re at least somewhat familiar to most people in how they work. Fortunately, display managers like ssdm and lightdm will let you choose the environment you log into, so for now we can leave everything in place, and just login to it later.
I’m going to give the list of what I want when I get a system set up, you probably won’t use all of these right away, but you’ll likely need them at some point. Before you do this though, make sure you’ve enabled multilib in /etc/pacman.conf, and update (just run yay).
i3-gaps, rofi, picom ,polybar(AUR), lxappearance-gtk3, kitty, deepin-terminal-gtk, polkit-gnome, thunar, nautilus, mpd, ncmpcpp, evince, vivaldi, vivaldi-ffmpeg-codecs, firefox, pavucontrol, krita, libreoffice-fresh, nomacs, feh, typora (AUR), gparted, deepin-screenshot, audacity, vlc, kicad, obs-studio, wine, firewall-d, zsh, tldr, autojump (AUR), bat, lsd, duf, htop, progress, youtube-dl, hexyl, fzf, optipng, jpegoptim, speedcrunch, caffeine-ng, redshift
if you want to game, you’ll probably want
steamtoo. I recommend usingsteam-native-runtimeand installingsteam-fonts. Steam also provides ‘proton’ which is likewineon steroids. It makes a huge number of Windows games work with no added effort.
What are all of these things???
| Name | Use |
|---|---|
| i3-gaps | The thing that tiles and tabs windows, draws the title bar on windows, handles window open/close events, resizes windows, etc. Literally the Window manager. |
| rofi | The ‘runner’, opens a window for you to type the name of a program you want to run into |
| picom | The ‘compositer’ - prevents weird graphical bugs, lets you use transparency and shadows, etc. |
| polybar | provides the bar at the bottom of the screen |
| lxappearance-gtk3 | Lets you change the theme of graphical programs |
| kitty | Terminal emulator |
| deepin-terminal-gtk | Another Terminal emulator |
| polkit-gnome | allows graphical programs to request your password |
| thunar | file manager |
| nautilus | another file manager, a bit slower to use but handles remote connections well |
| mpd | the ‘sever’ side of the music player I like |
| ncmpcpp | the ‘client’ side of the music player I like |
| evince | pdf++ viewer |
| vivaldi | my web browser of choice |
| vivaldi-ffmpeg-codecs | lets you watch youtube videos without the browser shitting itself |
| firefox | spare web browser. Trust me. You want two. |
| pavucontrol | volume control |
| krita | art program |
| libreoffice-fresh | Word, Excel, etc. alternative. Can open word docs. |
| nomacs | good image viewer, with some editing capabilities |
| feh | minimal image viewer |
| typora | markdown document editor |
| gparted | storage manager (reformatting hard drives, etc.) |
| deepin-screenshot | Screenshot with some editing built in. |
| audacity | audio editor |
| vlc | media player (video++) |
| kicad | PCB design software |
| obs-studio | screen recording++ |
| wine | run windows programs on Linux. do not use this for driver software, bios updates, etc. |
| firewall-d | Firewall service and config program |
| zsh | shell, better than bash |
| autojump | make shell navigation faster |
| bat | better in-terminal file preview |
| lsd | better in-terminal file listing |
| duf | quick disk usage viewer |
| ncdu | disk usage analyzer, find what’s filling your entire disk |
| htop | like Task-manager on steroids |
| progress | view progress of a running terminal app |
| youtube-dl | download videos/gifs from basically any website |
| hexyl | hex-dump file |
| fzf | dependency for many other things, useful to make quick terminal menus |
| optipng & jpegoptim | lossless shrink of image file sizes |
| speedcrunch | fast to use calculator program |
| caffeine-ng | ability to turn off screensaver/suspend from tray |
| redshift | bluelight filter to prevent your eyes from bleeding |
This might work, but also might not, installing packages in bulk fails sometimes
[TODO] one-liner install with –needed
First things first, lets get switched over to zsh and setup oh-my-zsh and autojump.
[TODO]
Pop open your text editor to work on your ~/.config/i3/config file, and go ahead and open up the i3 User’s Guide in a browser for reference. We’re gonna get cookin’.
[TODO]
inside your i3 config file you may want to set specific actions to take place based on a window’s name (bind all social applications to a social workspace for example) to do this you’ll need to get the windows class using a tool like xprop
Customization Resources #
If you’re looking for more ways to make your setup the best it can be or config files you can steal from check out r/unixporn.
[TODO] https://github.com/mjswensen/themer
The Physical Environment & Hardware #
Working on a laptop with a mushy membrane keyboard is totally fine for some people, but when you’re deep into some complicated work having the best possible setup can save a lot of time, frustration, and mental overhead.
Furthermore, the work environment can change how long you can work for and how productive your work time really is. Be it for comfort or productivity, there are many reasons to take care in making sure you’re setup is right for you.
If you are on a laptop some of the following is still applicable, but consider how any of what I’m about to mention may be adapted to your own setup.
Displays
The way you use your monitor is more important the monitor itself. Don’t get me wrong, if you have an 11", 4:3 aspect ratio monitor running though VGA there’s a limited amount you can do, but there’s still some things.
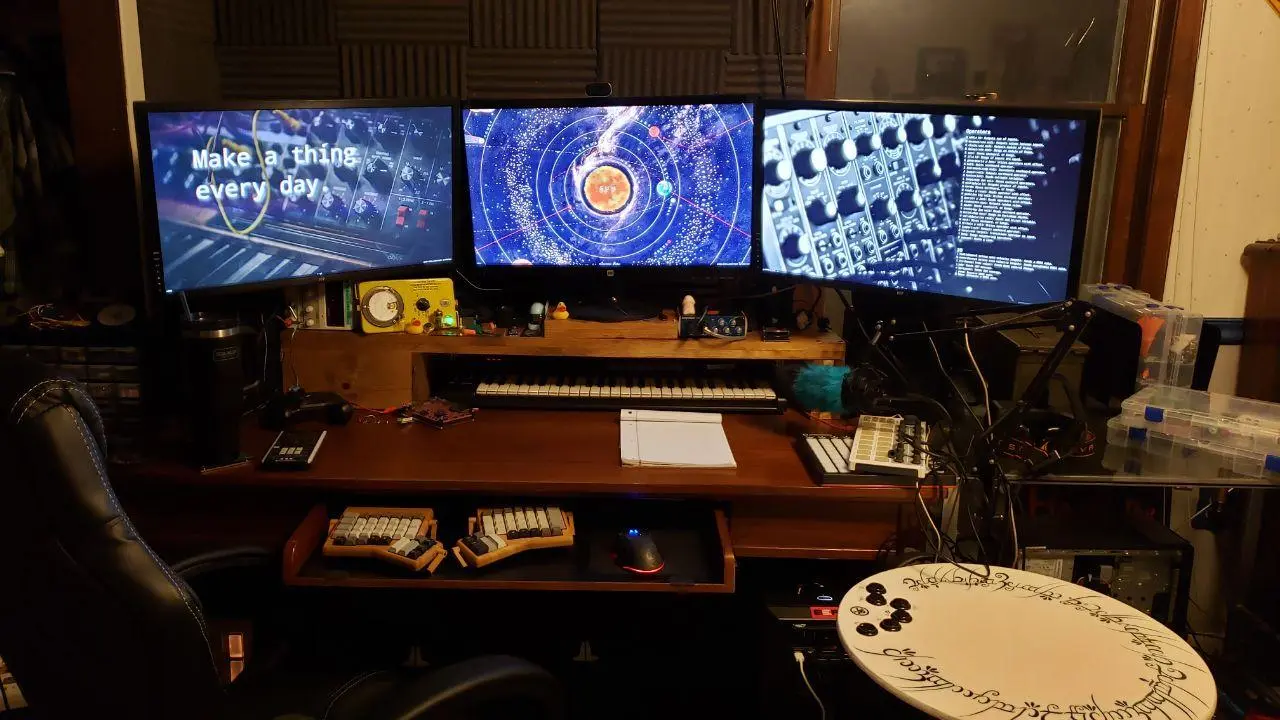
First and foremost is positioning. I’ve helped many a office worker complaining about neck and back pain simply by raising their monitor closer to eye level. Ideally you want your eyes to naturally rest right on the on the top 3rd line of your screen, about the level where the left-most knob is on the wallpaper on my right-most monitor in the picture above.
Unfortunately, there is no magic rule for how far away your monitor should be from your face, as this highly depends on your vision, monitor’s resolution, and size
on this note, you’ll often hear monitors described by their dots per inch, this is a measure of the number of pixels in a square inch on the screen, the higher this is the finer the details, but the smaller any given element on screen will be. Apple’s Retina displays for example have a high DPI rating, which is a large part of the reason they look so good
I personally have my three, 4k (that’s 3840×2160, or 4 times the resolution of 1080p) monitors positioned approximately 30 inches from my eyes.
Before moving forward though, I think it would make sense to talk about some of this display terminology. With that, I present far too much information condensed into one box:
Aspect ratio is the ratio is the ratio of the width to the height of the screen, most modern screens are 16:9, or have 16 units of width for every 9 units of height. Most older displays, often now called square screens, are actually 4:3. Many people actually still prefer this for the extra vertical room it affords at a given size, and some laptops are actually moving back to a more ‘square’ aspect ratio. On the other hand more exotic ultra-wide displays are also coming out
Sizing of displays is a bit odd. A 27" 16:9 display, is not the same size as a 27" 4:3 display as displays are measured diagonally.
Resolution of a display refers to the number of pixels, HD technically starts at 720p, or 720 pixels across, though this is generally rather low by modern standards, with acceptable usually considered 1080p, which is technically 1920×1080. You may also see 1080i, this is a strange concept, not actually related to resolution, but more to refresh rate. Interlaced Video (Wikipedia)
QHD is 1440p and 4k (ignoring the mess of naming there) is usually 2160p. I recommenced against 1440p unless the system is mostly for gaming, as scaling from most content that is in 1080p to 1440p is awkward compared to the direct 2x scaling with 1080p to 2160p
The interface on your display matters greatly as well, the most common at the are HDMI, Display Port, DVI, and VGA
VGA is the worst option here, as it’s an analog signal. This means the signal can do strange things, getting corrupted between your computer and the monitor. Typically this is a blue, screw in connection with many pins
DVI is still pretty common and looks like an even larger VGA connection, with a typically white, screw in connector. This signal is normally digital, though there is a varient of DVI that can be adapted into VGA. Of note, DVI can also be adapted to HDMI though you will not have audio, as DVI does not carry sound
HDMI, probably the most well known connector, has multiple revisions, the revision determines many things such as the maximum resolution, refresh rate, and weather or not more obscure things such as HDR are supported. HDMI is usually considered the best of these three options
Taking the crown however, is Display Port (DP). Like HDMI display port does have multiple revisions which do differentiate similar things; however, Display Port will generally support high resolutions and more features at any given point. Assuming you’re running a bog-standard 60hz 1080p display however, you’ll find no difference between DVI, HDMI, and DP - unless you need sound.
Next, you’ll want to note the refresh rate of your monitor. This is how many times per second your monitor refreshes the screen. Typically monitors run at 60hz and TVs at 30 or 60. Because unlike a TV you’re causing things on screen to change though, 30hz is generally considered bad and can even cause motion sickness. While 60hz may be standard, going for something even higher, with many displays offering well above 120hz, is something you may want to consider, especially if you plan on gaming.
Newer displays may support Freesync or Gsync, and both of these technologies require a supported graphics card in the system as well. These allow the display and computer to adaptively change the refresh rate so the monitor and computer both send and display frames in sync, which can make even a low refresh rate ‘feel’ much higher. This is a feature typically marketed to gamers and only supported in video games, but this has been changing. Gsync monitors generally have a much better implementation of the technology but it requires an Nvidia graphics card. As of the time of writing both Freesync and GSync are supported on linux, but quite rough around the edges.
Related to refresh rate is latency. In general this can actually mean two things, one is how long it takes for an image sent to the screen to actually be displayed. The lower this time the better, with good screens being sub 10 millisecond. Unfortunately, there’s no standard among the industry to measure this and many get it wrong.
Also with latency there’s grey to grey times, this is a measure of how long it takes a pixel to go from one shade to another. The lower this is the less motion blur the screen will exhibit.
The color depth of the display determines how precisely a color may be displayed. The higher this is the better, but almost all modern displays will be the same, and unless you’re an artist or creative professional you’re unlikely to notice a difference
On the other hand, you are likely to notice the color gamut or what range of colors the display is actually capable of displaying.
For example, two displays may both be capable of displaying 255 levels of red, but if one display’s range is only from a dingy red to a dark-ish red, while the other is from a brilliant red to a deep dark red, there’s a massive difference in color availability. If this is important to you, notably as a creative professionally in photo or video, you may want to read more at https://en.wikipedia.org/wiki/Gamut
The next obvious thing to mention is dynamic range, or how deep the blacks are and how vivid the whites are. Again, this is simple, the higher the better. Many display types (LCD, TN-Panel) will have similar specifications in all these areas, but particularly here. OLED is probably the best when it comes to dynamic range as it can display true black by actually turning the source of the light off, but unfortunately these are quite susceptible to burn in and image persistence.
Actually, display technology overall (OLED, LCD, TN, CRT, etc.) will have more of an impact than anything else. But, this is also getting really into the weeds, and I don’t want to recommend one technology over the other since depending on many other factors on each display theres no clear winner, as everything is a trade off - OLED is probably the best as it can display true black by actually turning the source of the light off, but it suffers from bad burn in, plus moving the image quickly can result in a ‘purple smear’ - something you may have noticed when scrolling though images on your phone. You probably won’t find an OLED monitor for sale anyways because of this. Great for movies, but when you have un-changing elements on screen for hours at a time it’s not ideal.
There are some newer displays which feature HDR or High Dynamic Range, which allows the panel to selective change the brightness in an area of the screen, giving much better dynamic range in supported applications than a normal display
clearly there’s a lot to be considered here. A no compromise monitor can cost thousands of dollars, but nice 4k 27" monitors like mine can be found for <250 on sale, and I love them. Just figure out what you need and what would be the most beneficial for you and work from there.
One of the great things about i3 is how powerful it can be with multiple displays, though even if you’re not using i3 having a ‘multi head’ setup can be a god send for productivity. Even if your monitors don’t match it’s worth it. If you have the budget to get two matching monitors, great, if not just getting a cheapo used monitor from a thrift store will be a massive improvement. I think 2 is the magic number for most people. 3 monitors take up a lot of room and unless you do some very multi-tasked things you won’t see much benefit that using something like i3’s workspaces wouldn’t provide anyways.
Another thing to mention is red-light filters. While I dont personally use one many people find that reducing the amount of blue light coming from their displays significant helps with eyestrain. If this interests you give redshift a shot. I use it every now and then if I have a headache.
Keyboard
Probably the most important thing you can do for your workspace is getting a nice keyboard. If you’re rocking a rubber dome or membrane keyboard, moving to a mechanical keyboard will make a massive difference.
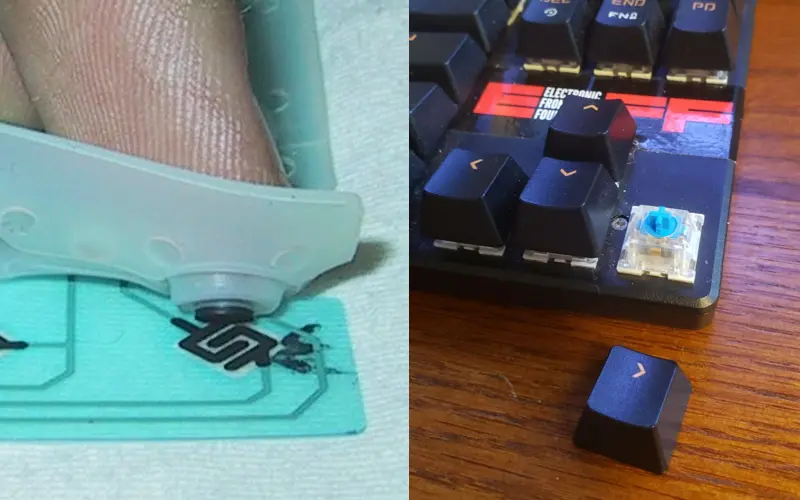
The membrane/rubber dome keyboard on the left doesn’t give much physical feedback to your fingers when you press a key, compared to the mechanical key switch on the right. A decent mechanical keyboard can be found on amazon for <50 USD, though as with anything in life the more you spend the better the product. One thing to keep in mind is the color of the switch used. Above you can see that keyboard has blue switches, blue switches have a noticeable ‘bump’, that is the switch has a spot of higher resistance before it actually bottoms out, and the key actually presses at this point, furthermore, blue keys are clicky - they are loud and some people find this annoying. Finally, they’re also pretty light, not taking too much force to push down. Generally, blues are considered the ‘gold standard’ among typist, but games on the other hand may prefer a brown, red, or black switch.
| Linear | Bump | Bump + Click | |
|---|---|---|---|
| Light | Red | Brown | Blue |
| Heavy | Black | Clear | Green |
these are the common colors and how they feel for Cherry MX switches. Most other mechanical switches are ‘clones’ of MX switches- though sometimes these clones are actually superior- but these clones don’t always follow this chart
really it’s all a matter of preference, I’m actually using a switch not listed here on my keyboard, but generally finding what you like among the above first is a good place to start. If I’m not using my main keyboard I generally use Blues. If you’d like to try some out before pulling the trigger on a full keyboard you can find switch test boards for sale online.
Furthermore, there are other types of switches like IBM’s old Model M line which use a buckling spring, which are quite stiff and have a very unique, heavy feeling. If you don’t want to use a 20 year old keyboard Unicomp makes clones that are quite nice.
You should also consider they layout of your keyboard. Some people absolutely need a number pad while others are happy to omit it and have the shorted hand travel to their mouse. Even still others want an extravagant number of keys or a weird split keyboard like mine: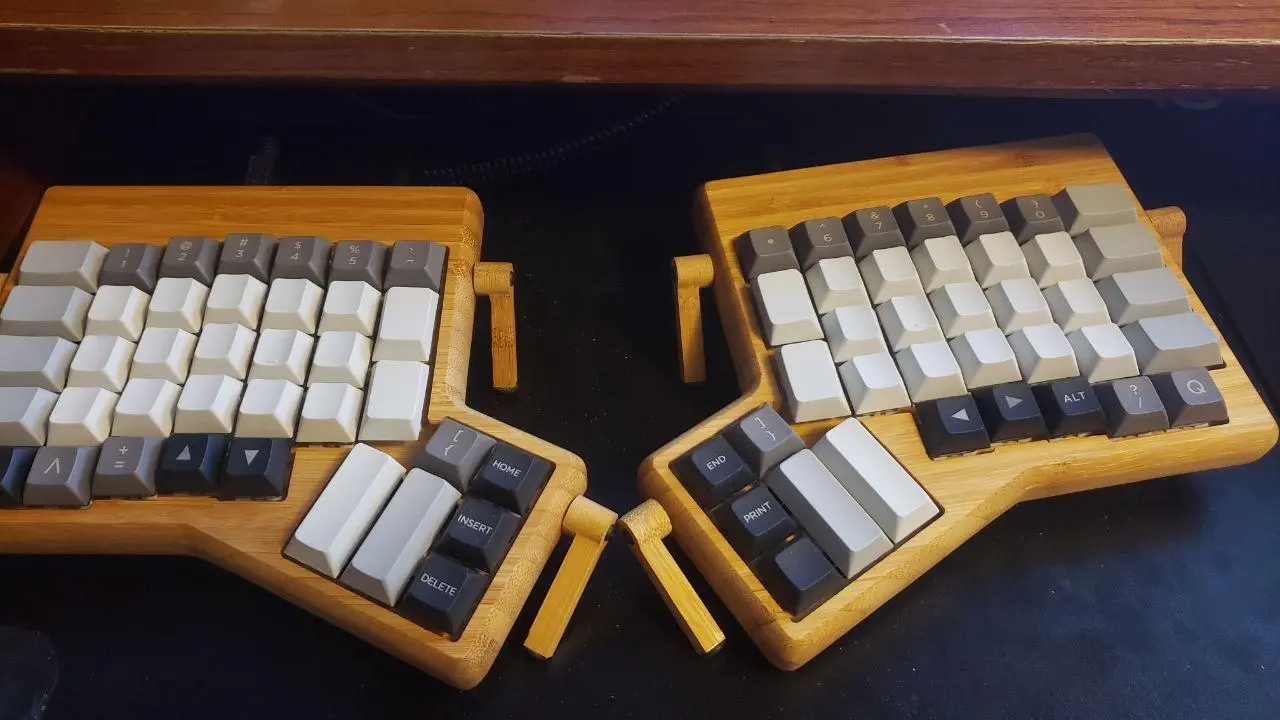
This is a custom built ErgoDone keyboard, The Ergodox-ez can be purchased for ~300 USD, or you can build one like mine for a bit under 200
r/Mechancial Keyboards is a good place to go for inspiration and more information

though obviously anything is possible. A lot of programmers like to disable their Caps key for example and put something more useful there, or you may just want to move around a letter or two. Using a standard layout like Dovark is a bit easier though as I can easily load my keymap pretty quickly on any computer. Plain old Qwerty is fine, but I personally like my ‘weird’ keymap.
If you’re shelling out big bucks on a nice keyboard anyway, you may also want to get a keyboard which supports QMK, a completely open source firmware which gives you total control of your keyboard, allowing you do to cool things like type greek letters ( Ω , α, β) or type parentheses by tapping the shift keys. I find that particularly helpful as my keyboard doesn’t actually have enough keys to do have every key nicely available (note how I don’t have a function row) for more info check out https://docs.qmk.fm/#/ . You can actually buy an adapter to use a normal keyboard with QMK, but it’s a bit hack-y and I really recommend just saving up to get a full keyboard made for it.
Back to ergonomics, you’ll want to make sure your keyboard is a t a comfortable height for you and that you can type in a way that isn’t putting your wrists at any weird angles
Finally, one of the nice things about i3 is the ability to navigate everything entirely from the keyboard as well as bind as much as you want to as many keys as you’d like. Want a key combo to launch a file manager? easy. Want a key to navigate to open up a terminal and immediately run a command- no problem. Set things up as you like and enjoy being able to use your system at break neck speed while everyone else drags things around slowly.
Mouse and other input
Speaking of dragging things around slowly: The mouse
Sound
Noise isolation both electrical and physical, headphone types (over, on, in), amplifiers, dacs, ASIO/ sound hardware, connection types
The Desk and Chair
Lighting
Air Quality
This Is Your Brain On Stale Air (YouTube)
Various Programs: #
Markdown
[TODO]
Marktext, Typora, colabrative editing, GitHub markup, etc
Taskwarrior & Timewarrior
[TODO]
Taskweb
File Explorers & Storage Managment
[TODO]
Ranger, Thunar, Nautilius, Baobab, Gparted
if you use Nautilius, you may want to run
|
|
so that the file paths are displayed in full
Media (Music, Video, PDF,)
[TODO]
Office & Creative Software
[TODO]
https://github.com/climech/grit
Libreoffice
Krita
Audacity
DAW? QJackCTL?
OBS
KiCad
darktable
Evince
Feh, nomacs
Wine
Boxes- vm
Package managment
[TODO]
Pamac, Steam, AppImg, itch.io, dpkg, snap.
maintaining an aur package, pacman conf stuff
Web and network protocols
[TODO]
Vivaldi, Firefox, Syncthing, Beaker, IPFS, IRC - irssi, Telegram, Etherape, Wireshark, gufw,
Shell Scripts
[TODO]
Tools for accessibility #
https://joshwcomeau.com/accessibility/hands-free-coding/
Lil’ shoutout
I’ve stolen a lot of config files from r/UnixPorn and other websites over the years, but I’d espically like to highlight https://twily.info as twilly actually helped me out a lot when I was a total noob and even helped me steal her website to make my own clone of it at one point