Getting Our Hands Dirty #
Music, like any creative endeavor, requires you keep your left and right brains equally talkative.
- Mixing parts together
- Studying music theory
- Getting core components of the song laid out
- Practicing tecnique on an instrument
- Writing lyrics with good timings and structure

- Using weird sound sources
- Combining effects
- Finding inspiration outside of music
- Adding fun frills to the song
- Writing vivid, emotional lyrics
If you know that you’re a creative type, try to focus on the science and math and technique of things more on these pages and as you practice. Learn how sound actually works and interacts in your environment and how knowing these things well let you make better art.
If you’re deeply into math and science but want to get into music, still learn what you need but remember to squish that voice down sometimes and to try the weirder things. Stack 14 distortions on top of each other. Use a Kazoo as core element in your song. Try things, experiment, and keep the emotion you want to convey in mind as you work.
With that out of the way, let’s actually make some music.
To get started, we, uh, need something that makes sound. Now, the two of us have a bit of a conundrum here as I am to you no more than words on a page and you to me no more than a hypothetical reader. I don’t know what you’ve got for existing musical chops, let alone gear. So, I’m going to try to make as few assumptions about you’re setup as I can. This is, to put it mildly, not great.
Ideally, I think you should learn music on something tactile. This could be a cheap MIDI keyboard or a starter guitar, but I can’t possibly write for every option you may want to start with. So, I will target something that, unless you’re reading this on a phone, I know you have: a computer with a keyboard. Of course, this means we’ll need some software. For this, I’m going to recommend you go download and setup https://vcvrack.com/.
When it’s setup you should see something like this:
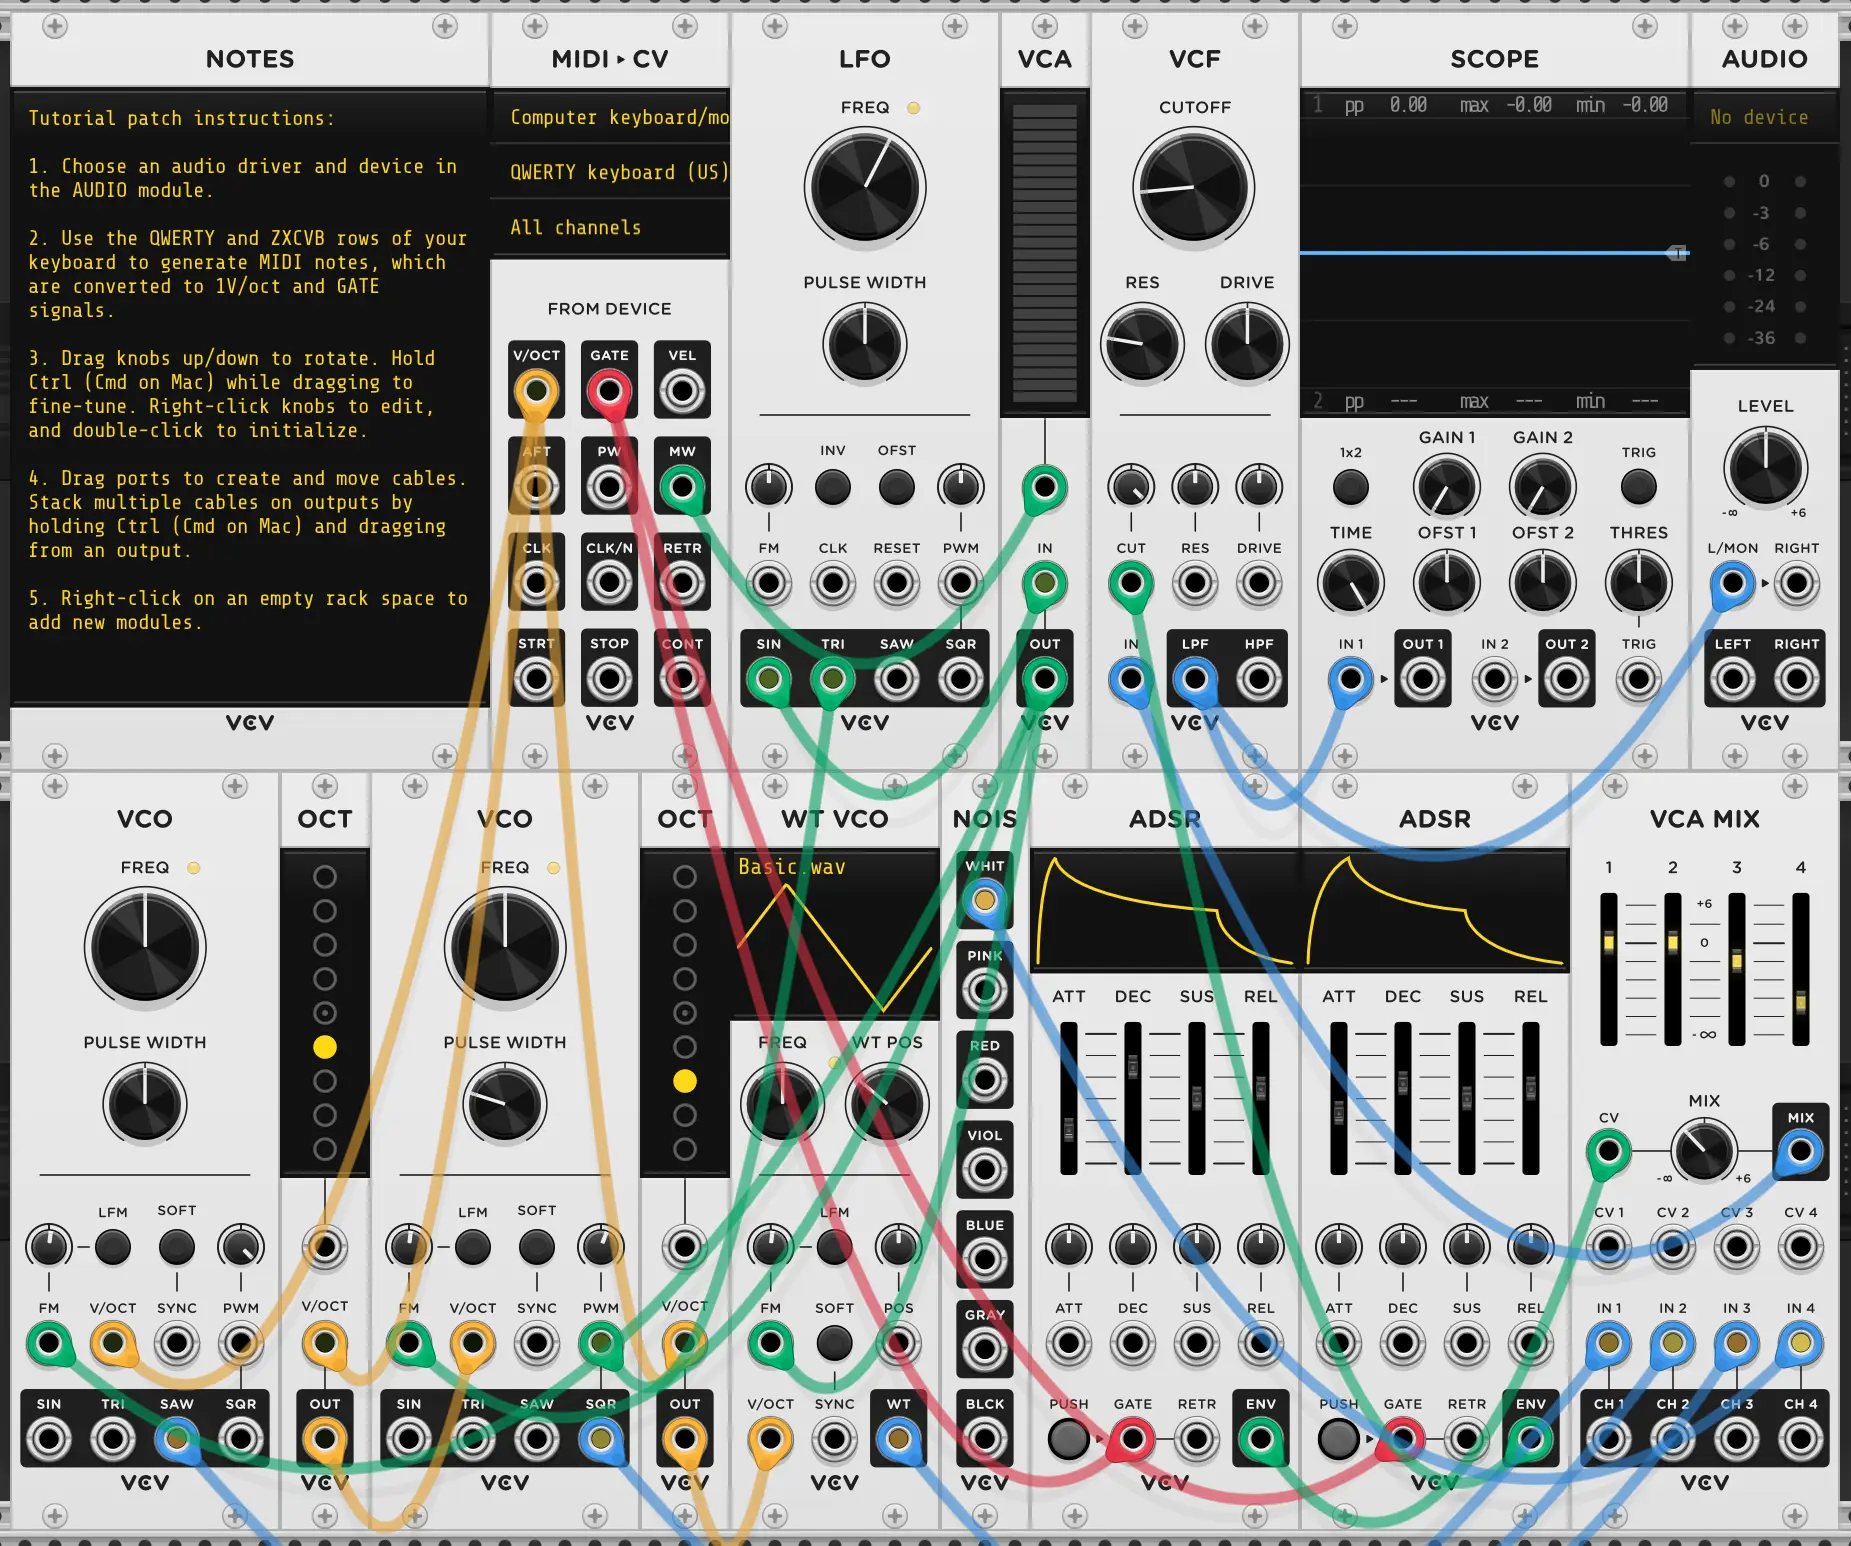
This has instructions, but, uh, wow point 1. assumes you know a lot from the bat. Ideally, you should be able to click the yellow text the top right, in the AUDIO module where it says “No device” and select your audio device and holy what the fuck is this:
Okay, so, there’s clearly a lot of options here, and this is only in Windows. The actual list and possible drivers will vary if you’re on Mac or Linux.
The gist is you have a list of drivers, devices, sample rates, and block sizes to choose from.
The driver is how the computer talks to the sound making device. Not all are made equal. On Windows, generally, ASIO is better than WASAPI is better than DirectSound. By “Better than” I mean it should be less glitchy, lower latency (latency = how long does it take for something you to hear the result of something do on screen / pressing a key ) and, in some cases, allowing you to use a micophone/line in or not (DirectSound doesn’t let you.)
The device is, well, what device you want to use. On some computers, there may only be one option, but if you have monitors connected via HDMI, they may have built in speakers so show up as an option, as may a gaming headset, your webcam (if it has a built in microphone), etc.
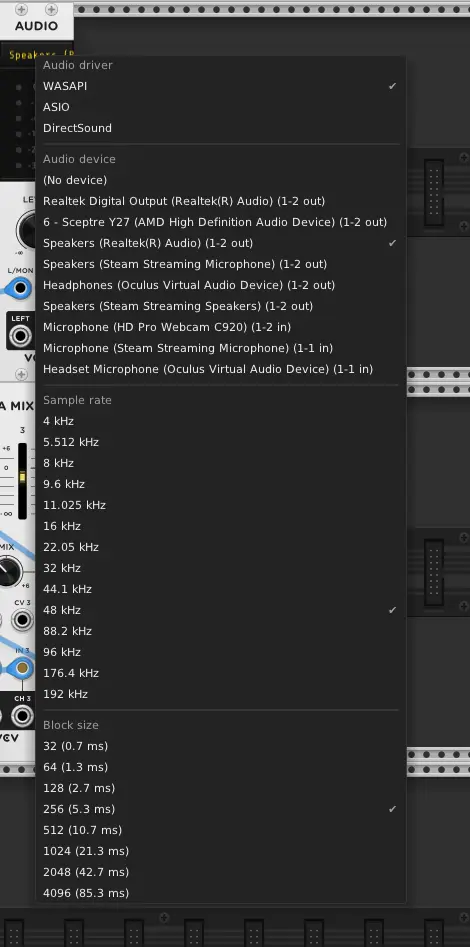
Making matters more confusing, some devices will show up multiple times with only slight variances in names. On the computer in this screenshot, the speakers are hooked up to “Speakers (Realtek(R) Audio)” and not “Realtek Digital Output (Realtek(R) Audio)”. You may need to click a few until you find that you can get sound out. Just click one, mash some keys, see if you hear anything. If not, try another.
The Sample rate will ultimately determine the quality of your audio, but also how hard your computer works to make the sound. In nearly all cases when using VCV rack you’ll want to be using either 44.1kHz or 48kHz. When you pick a device, it should default to one of those two, just leave it on which ever it uses.
The Block Size is the trickiest setting here. In short, your computer processes audio in chunks, this is how big those chunks can be. If you let the computer work on bigger chunks at a time, it doesn’t have to work as hard BUT because those chunks are bigger, and so longer time-wise, there will be more latency (delay between you clicking a button and hearing the result). If you go too low, the audio will start to break up, sound robot-y, and just generally glitch out. This really means you need to keep lowering this value until it breaks, then just back off to the last setting before that happens.
If you still have issues, here’s a tiny bit more info to point you in the right direction:
On Linux you’ll want to use Jack https://wiki.archlinux.org/index.php/JACK_Audio_Connection_Kit with VCV for low latency audio. You may need to use a tool like Catia to actually connect the software to the device (VCV to System Out). Most modern distros use Pipewire, which eventually should replace Jack, but as VCV doesn’t work with it directly for now you’ll need to bridge Jack to PipeWire. This is bit of pain in the ass to setup, but, if you’re on Linux presumably you have some idea what you’re in for.
For more Linux audio info check out Making Sense of The Linux Audio Stack on Venam’s Blog.
It’s very unlikely that you won’t be able to get sound out at all on Windows, but it’s very likely that you won’t be able to get low latency sound or sound working with audio input (microphone). If this is the case you probably need to use the ASIO driver.
If you don’t want to spend any money, you can try downloading and setting up either https://www.asio4all.org (easier) or https://github.com/dechamps/FlexASIO (harder to use, more flexible, you may want to use this with it). Setting up either is outside the scope of this page.
The ideal way to solve this problem is to buy an audio interface with a good ASIO driver made by the manufacture. Interfaces by Focusrite, Presonus, Arturia, and NativeInstruments are all decent and should automatically install a stable, easy to use ASIO driver that just works. Avoid the cheap Behringer interfaces, those often don’t.
Alright, if you’ve made it this far, mashing keys on your keyboard in VCV rack should make noise!
First thing’s first, let’s learn by just experimenting. You have a huge range of knobs in front of you, don’t you wanna turn em’? Go for it. ctrl + z is always there if you need it. Worst case, file→new is always an option. Just have fun. When you’ve gotten a vibe for what effect some knobs have or want to dive into what this chaos of virtual wires means, come back here.
The reason we’re starting in VCV rack (aside from it being one of the few free options) is it exposes a lot of the raw ideas and fundamentals of how music works behind the scenes, raw frequencies and modulation open to see.
In that default patch, er, hang on -
- in VCV, the files and the project as whole is refereed to as a “patch”, this is because you plug wires together into a board similar to those used in old phone system where you’d patch two people together -
We start with a MIDI (Musical Instrument Digital Interface) input which outputs a ‘voltage’ from the V/oct (Volt per Octave) output, which is fed into the V/oct input of multile VCO’s (Voltage Controlled Oscillator)
That hurt to read? Let’s break it down.
First, you need to know something about VCV Rack, this software. VCV rack actually emulates real hardware systems called modular synthesizers.
More specifically, VCV emulates the Eurorack standard of modular synths. Skipping some finer details for a moment, the standard defines one really important, and that’s the idea of 1 Volt per Octave frequency control.
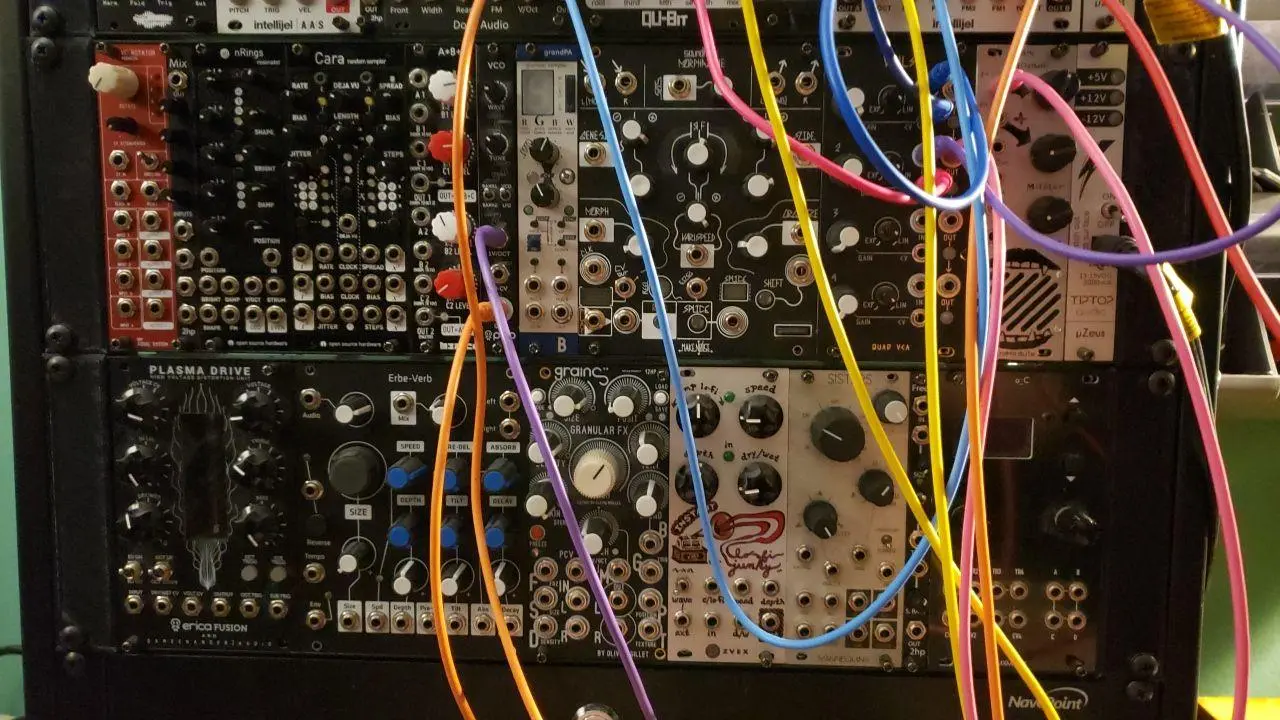
This is Stinkbomb’s hardware Eurorack. Real Eurorack hardware is incredibly expensive!
In the real hardware, all of those wires are carrying a signals in the form of varying voltages. Some of these are varying really quickly so that they can ultimately be passed to the output and play a tone though a speaker.
Others are slow, often below what you can hear, and are used to sort of act as ghost hand that you can use to turn a knob for you, automatically, perfectly timed and never getting tired. Useful for when you want to turn more knobs than you can with two hands at once and at different speeds.
Others yet are carrying voltages that are mostly constant, only changing to a new value occasionally (but usually quickly), these voltages are then interpreted by a module that makes one of those moving waves to determine how fast that wave should move - it’s frequency. That is, we’re using these voltages to control an oscillator - hence the name VCO (Voltage Controlled Oscillator).
Now, this is where the aforementioned 1 Volt per Octave comes into play. Remember on the last page I mentioned how each time you go up to a new octave you’re doubling or halving the frequency, so we want to visually compress that in the spectrum analyzer to make it easier to see? Well, the same idea applies here. On the modular synth the system can only really use values as low as -12 volts to as high as 12V, though for practical reasons, we often only use ±5V. If we had to double the voltage for each octave and we assume the first octave is from 0 to 1V, then the second would be from 1V to 3V, and we’d already have to go higher than 5V to get a 3rd octave. From a hardware perspective this is already not ideal, but from an ease of use perspective, it’s also annoying to constantly think about the doublings. It’s a lot easier if we just always cram an octave into 1V. This means the complexity of doing that exponential conversion has to happen in the hardware, but it frees it up to be a lot easier to use.
Of note, we can always plug any output wire into any input. We could try to listen to these slow signals. We could use one of the really fast signals to control a knob as a “ghost hand” (and you should do this, it’s really fun!). This means we could use those really slow moving “ghost hand” signals to control our pitch if we wanted, it would just be interpreted as 1V/Oct.
Generally, in a 1V/Oct system, a stable 0v (the same as no input) signal is ‘Middle C’ or C4 where ‘C’ is the note and ‘4’ is the octave number. This is only ‘generally’ the case, as almost all oscillators will have a big ol’ frequency knob you can use to change what 0V means.
Okay, we’re almost there.
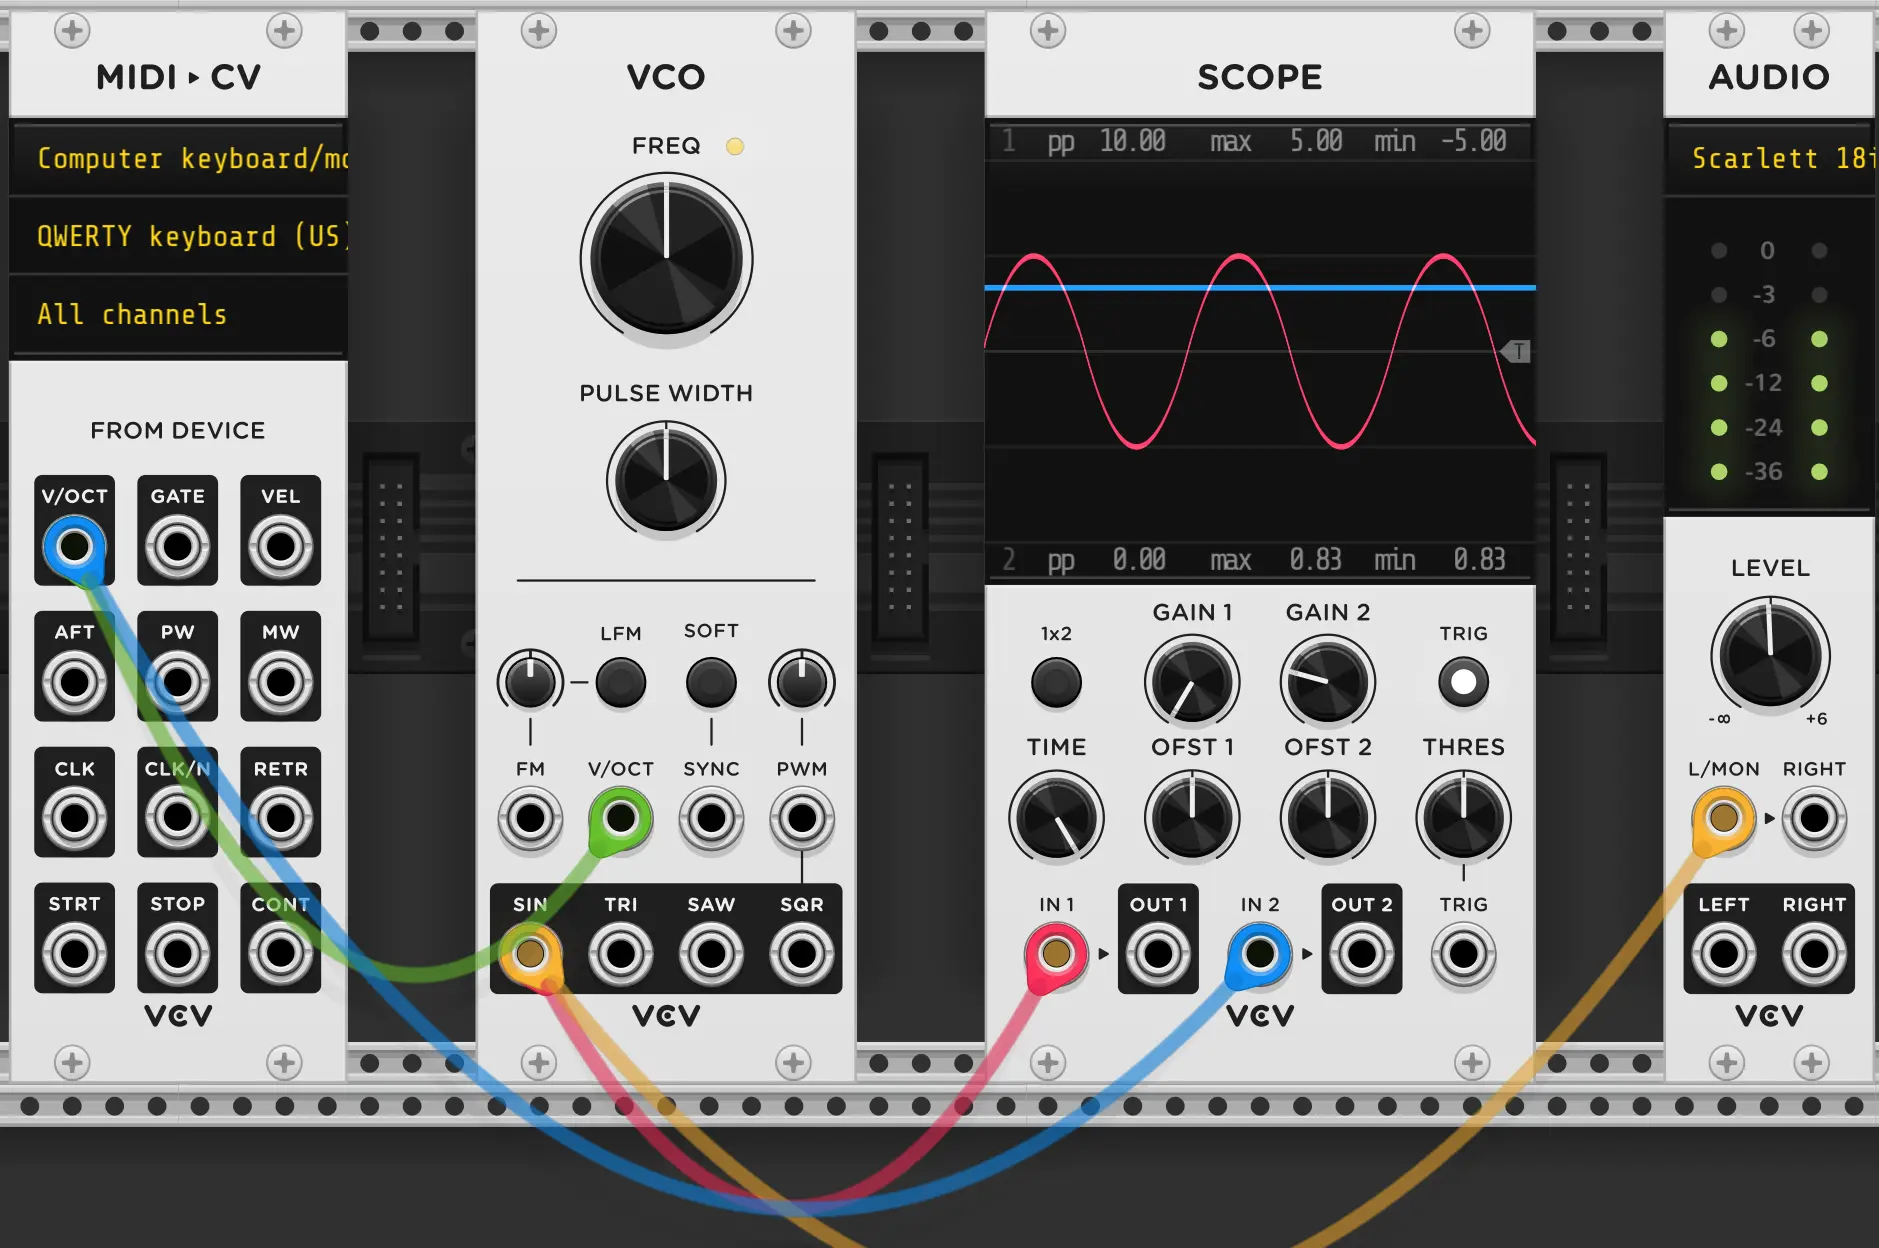
So, with VCV open, when you strike a key on your keyboard it should generate a new signal using this 1V/Oct system. let’s see this happen.
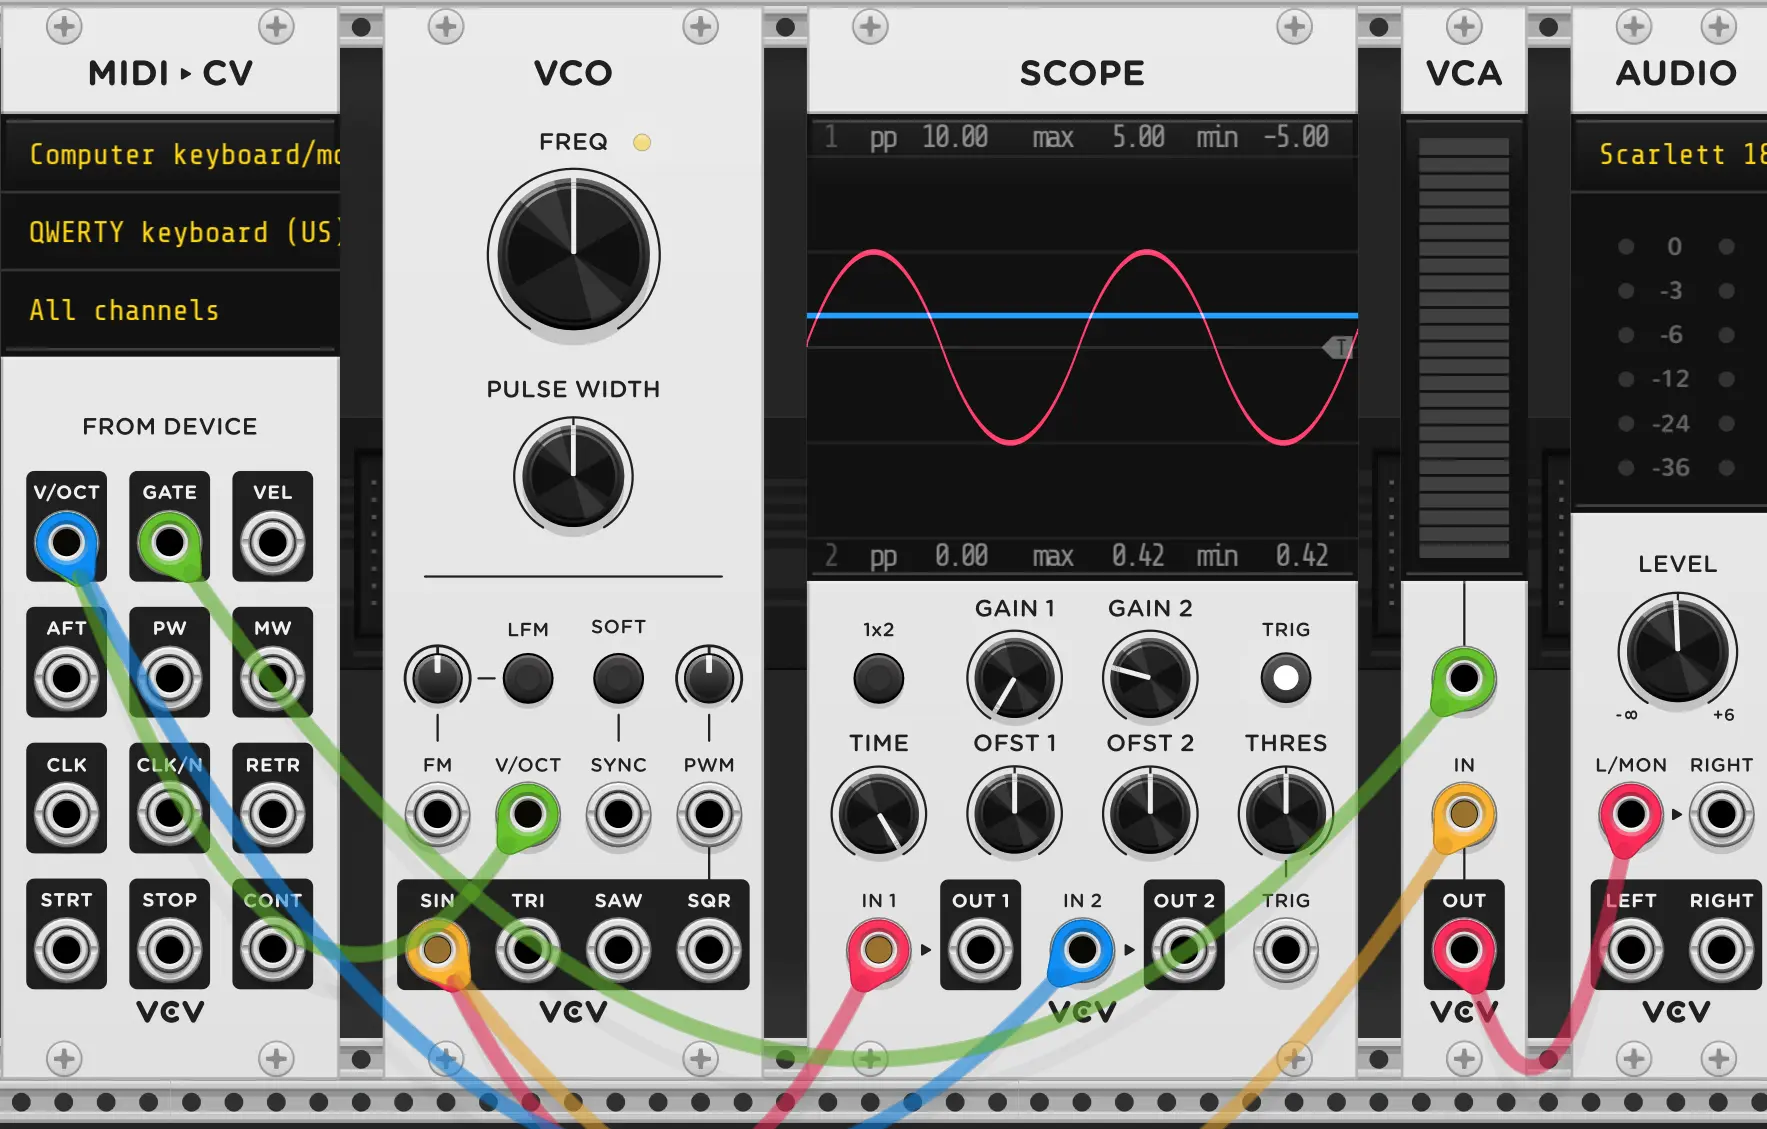
In the default patch you have open in VCV, you should be able to drag a wire from the port labeled in 2 on the SCOPE module and drop the other end on the v/oct port on the MIDI ▶ CV module. It’s okay that there are already other wires there.
You should now see an extra line in the Scope module. Even if it’s not a big change, playing a higher pitch note should make this line move up and a lower pitch note should make the line move down. (if you’re having a hard time seeing it, try going from z to p)
Okay, this now brought up a few more questions, namely what the hell is a scope, but patience. We still haven’t talked about MIDI.
When you strike a key on your keyboard VCV is interpreting that keypress as a MIDI event, and converting that MIDI signal to a virtual V/Oct signal.
So what’s up with this MIDI business? MIDI is a fucking old 1981 standard for how computers should and music hardware should talk to each other. It’s also often used to let multiple audio programs on your computer exchange information… very limited information though. Just which key on the keyboard (musical, not typing) was hit, how hard, and a few extra signals for getting corse grained adjustment of a few knobs. With the exception of three important ones you really need to knob about Pitch, Mod, and Sustain - but, in time. Let’s get back on track.
- You Press A Key
- VCV Receives this as MIDI event
- VCV converts this to an signal in the V/Oct standard.
So, if you happen to press the C note on the 4th octave, you’ll get… 0v, no change, but if you were to hit the C note one octave higher (C5) the note should be noticeably higher pitch and the output from the V/oct port would be 1V. In fact because of how our music system works, an octave is exactly a doubling in frequency so while ‘C4’ is 261.63Hz ‘C5’ is 523.25Hz). If you hit a C#5 note though the output voltage will be 1.08333V because there are 12 notes per octave (A, A#, B, C, C#, D, D#, E, F, F#, G, G#) and 1/12 is .08333 which is added to the 1V from being up one octave from middle C (C4)
Alright. Fuck that’s complicated. So, to boil that into a digestible chunk, you press a higher key, a higher voltage comes out, lower key, lower voltage. Keys above C4 will output a positive voltage, keys below a negative voltage.
So we hit a key, voltage comes from V/oct on the MIDI->CV interface and goes to the Voltage Controlled Oscillator, which, as it’s name suggests uses these voltages to control how it oscillates (moves). The V/oct input directly manipulates the frequency, but there’s also this big honking frequency knob just begging to be twisted. That knob can be used to make it so 0V corresponds to a different note. For example, if we right click the frequency knob to enter a value directly, and enter ‘440’ Hz that would make 0V into an ‘A4’ note (A is a common reference pitch, as it’s just multiples of 110Hz so it’s easy to remember) Now each key will just be ’transposed’ that is they’ll all be shifted over a few notes.
You can also turn this knob to something out of tune to get things completely out of the classical scale. The fine knob below does the same thing, but gives you fine control (obviously).
Let’s strip this down to the essentials then.
- Hover over every module in the patch except for the MIDI ▶ CV and AUDIO module hit delete or backspace to remove them.
- Then, right click the empty space and in the menu that pops up select a SCOPE. Drop that in. Do it again to add a VCO.
- Now, we need to wire things together. To start, let’s wire the VCO to the SCOPE so we can see the signal. Go ahead and drag a wire from the
SINoutput of the VCO to theIN 1of the SCOPE. On the SCOPE drag theTIMEknob all the way to the right (hold click and drag your mouse up) then click the button labeledTRIG. - Now, try moving the
FREQknob on the VCO. You should see the wave in the SCOPE expand and contract to show you the frequency! - But, we still can’t hear anything. Let’s drag a wire from the L/MON (left / mono) input of the AUDIO module to the same
SINoutput of the VCO. This cables should stack on top of each other. - You should now hear a constant tone which you can control by changing the
FREQknob on the VCO. - Connect the
V/OCToutput from MIDI ▶ CV to theV/OCTinput on the VCO. - You should now be able to press keys on your keyboard (assuming MIDI ▶ CV is still set to use the QWERTY keyboard) to change the frequency.
- The
FREQknob on the VCO still works, it’s just an offset applied to whatever is coming in on theV/OCTinput. - Connect a wire from the
IN2of the SCOPE to theV/OCTMIDI ▶ CV, again stacking cables. - Turn up the
GAIN 2knob on the SCOPE a smidgen to make changes the change in the signal the SCOPE is getting fromIN 2more obvious.
After approximately half a second, this should get very, very annoying. So, let’s make it only make noise when we play a key.
- Right click in the background and add a VCA
- Drag the wire connected to
L/MONon the AUDIO module and move it to the middle socket, labeledINon the VCA. You should no longer hear anything. - Drag a new cable from
OUTof the VCA toL/MONon the AUDIO module. You should have sound again. - Try moving the yellow bars on the VCA up and down (it works the same as a knob). This should change the volume. Double click it when done to set the volume back to max.
- Connect a new wire from the
GATEoutput of the MIDI ▶ CV module to the unlabeled, top input of the VCA. Note the line between this input and the yellow lines you were moving in the last step. When you do this, audio should stop again. - Play some notes. You should only hear sound when a key is held, and the yellow bars are gray except for when this happens.
- You can still drag the now-gray bars to lower the peak volume, similar to how you can adjust the
FREQknob on the VCO even after theV/OCTsignal was connected.
Some explanation is due. The VCA is a Voltage Controlled Amplifier, though contrary to the name, it usually only attenuates signals - makes them quieter. Basically, it’s a volume control where you can use another signal to set the volume. The GATE output of the MIDI ▶ CV module sends a very strong signal whenever you hold a key, so it either fully “opens” the VCA (lets all the sound though) or closes it (lets no sound though) but we could use another signal. For example, we could use slower sine wave to control it:
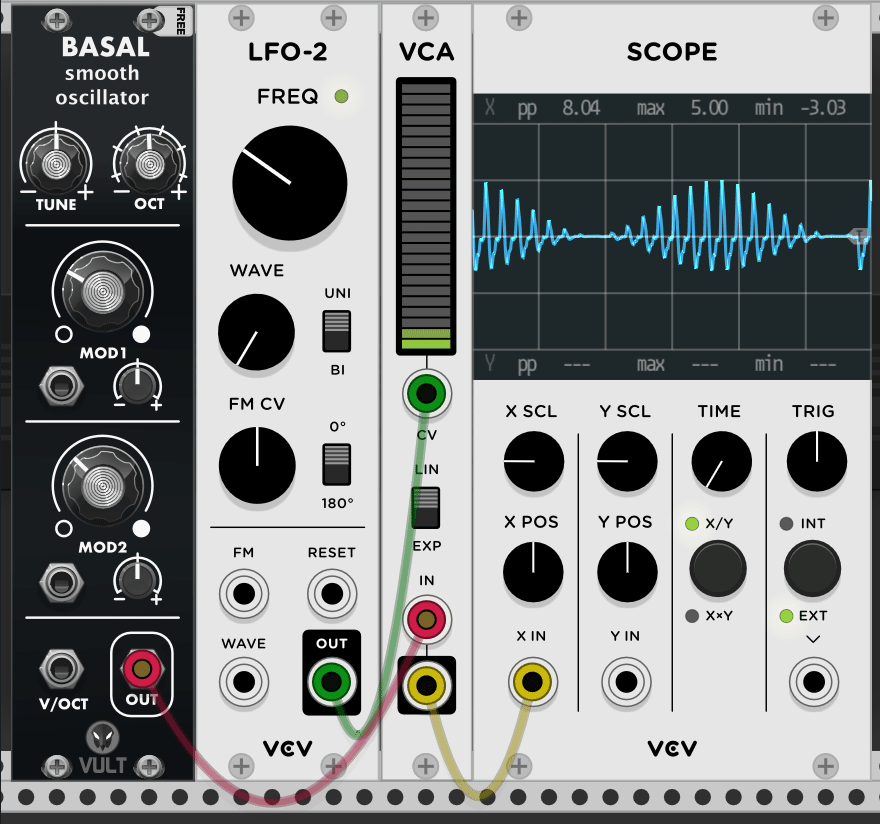
Basal here is just a VCO, it’s just from a collection of 3rd party modules for VCV rack.
LFO-2 is from an older version of VCV rack, but is effectively the same as WT LFO in modern versions. It’s a Low Frequency Oscilator, which is just a special VCO that’s specialized for making very slow signals that are usually meant to be used to control other things, not be listened to directly.
Why don’t you give doing something similar to this a shot. Find an LFO and connect replace the control input on the VCA with it, like has been done in the above GIF. See what kind of sounds you can get. (Hint: To remove a wire, just drag off one end, and without putting it over something else it can plug into, let go. It’ll disappear)