MIDI in Detail #
Musical Instrument Digital Interface, or MIDI is what it sounds like, the primary way to get data between devices digitally. Want to tell a hardware synth to play a sequence you arranged on your computer? MIDI. Want to play notes into your computer using a keyboard? MIDI. Want to sequence drums, with varying ‘velocity’ on each hit? MIDI.
Sounds Great?
For the most part, yeah. Everything works together and you can make all your hardware speak the same language. Let your keyboard talk to your computer, your computer talk to your drums, now you can play the drums with your keyboard! Send automation from your computer to a parameter on your synth to vary the sound over time, whatever. MIDI is pretty much carries all the information about your music expect the audio itself.
The Catch? MIDI is outright ancient by technology standards, having come out in 1981. It’s so damn old, that it’s (mostly) a 7-bit standard. Worse, over time the standard has had extensions bolted on and so older devices may not work exactly as expected. Now, ideally, a musician shouldn’t have to know what this means and the gear should stay out of the way. Unfortunately, we’ve been sticking with this standard for so long that basically everything abuses it in one way or another to the extent you sorta have to know how it works. So, 7-bit, what does that mean?
Well, it’s talking about bits, so 1’s and 0’s. For each message in midi, you get 7 bit’s of data. So, when you turn a knob it can range from 0000000 to 1111111, which, works out to be 0 to 127.
This means each knob, even if it feels smooth to you, only has 128 distinct levels whatever it’s talking to can receive. This is really bad. But, wait, it gets worse. This applies to almost everything in MIDI, so how hard you hit the keys and how finely you can set the volume with a physical slider. This really just isn’t fine enough control.
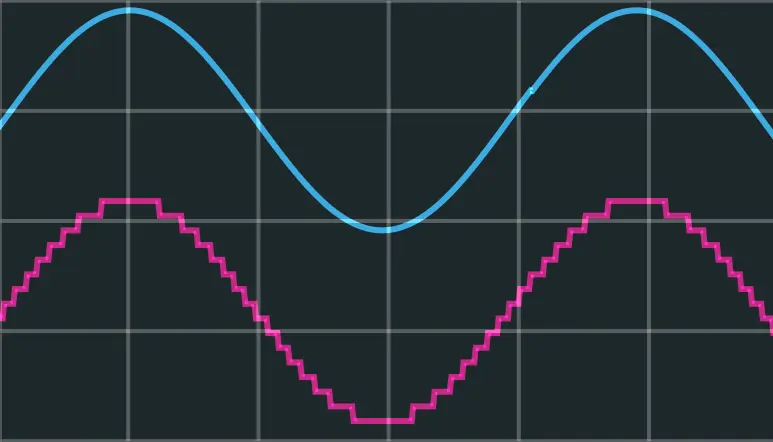
Here, this sine wave is being forced down to 4-bits, making the discrete levels obvious. If you imagine this is what is happening to the knob as you turn it, you could see how this would limit your possibilities and might make setting the knob to a sweet spot difficult.
Because of MIDI’s age and lack of resolution, there’s a whole fustercluck of things that have been done to make working with digital instruments work better over the years. Some you might see include
- MIDI Non-Registered Part Number (NRPN) is one way MIDI controllers can send higher resolution signals (14bit so, 0 to 16383) by putting two, 7-bit CC’s values together
- Open Sound Control (OSC) isn’t MIDI, but rather a competing standard that’s much higher resolution and can work over ip (wifi), but it’s not universally supported like MIDI
- Mackie Control Universal (MCU) is a fustercluck that has been bolted onto a lot of MIDI controllers. It mostly provides a ‘universal’ mapping for common functions like mute, solo, track select, EQ and what not. It basically just sits on top MIDI.
- Midi Polyphonic Expression (MPE) is probably the most convoluted of the workarounds, but it will require some more explanation, so I’ll come back to this in a second.
“Alright”, I hear you thinking, “MIDI is an old dumpster fire, what is it good for then?”
Well, it’s pretty much still the only one you can sequence notes in your DAW, nearly all instruments interface with each other and a computer using MIDI, and MIDI controllers exist in about every shape and form you could think of- from a traditional keyboard to just a huge grid of knobs. MIDI’s age also means that it is ludicrously compatible, as you can plug in hardware from over 30 years ago and it will still just work.
So, let’s dive into the details and see how MIDI actually functions
Types of Midi Messages #
Channels #
While not a message in itself, it’s necessary to note that MIDI connections provide 16 channels of communication. Usually each device only uses one channel at a time. You can use this for multiple things: If your keyboard makes changing the active channel easy, you may want to setup a different instrument on each channel. With this you could switch between playing a piano or synth sound on channels 1 and 2 easily. The other primary use is if you have multiple hardware devices that receive MIDI messages and make sound, like synthesizers and drum machines. You can chain them together with MIDI Through (more on this later) and have each one listen for notes on it’s own channel while using less cables.
Notes #
MIDI notes range from 0 to 127, with the highest note, 127, being a G9 @ 12543.9hz and the lowest, note 0, being a C-1 at 8.176hz. Obviously this is more than the standard full 88-key piano.
Given human hearing starts at about 20hz, the lowest notes are inaudible except for harmonics assuming no octave shifting or other quirks. As such, these lowest notes are often re-purposed for control messages. Even if they’re not, a lot of sound sources will only respond to a limited range of these notes anyway.
While MIDI does have an extension for supporting alternate tunings, it’s rarely directly supported. As microtonal and other non-12TET (12 True Equal Temperament) scales have become common, various tools exist to use MIDI pitch messages, which we’ll look at in a bit, to force notes to a chosen scale anyway.
General MIDI, one of various MIDI extensions (that often get ignored anyway) also defines a few specific instruments to belong to specific midi channels and program change messages (rarely used unless listening to midi files directly with soundfonts) one of these is a drum setting, which is really the only one that is still commonly used, and is generally close to the normal mapping you’ll see in tools like Ableton’s Drum Rack. If you buy an electronic drum kit or use a drum machine, it’s likely to at least try to respect this mapping from notes to drum sounds. Of course, you can still make any note map to any sound you like and ignore this altogether if you want.
General MIDI Drum Map
Note, the cells in blue are the notes used by Ableton (and in turn many DAWs which copied them) for their Drum Rack device, which is typically shown as 4x4 grid of pads, with the lowest note in the bottom left. There is no requirement that you follow the general-midi mapping when assigning samples, but it is probably good practice to match it up as well as you can. If you can’t, try to at least make parts spit in the same area frequency wise- put high-pitch samples on the higher-pitch spots and so on. This will make changing kits much easier.
| KEY | NOTE | SOUND |
|---|---|---|
| 35 | B0 | Acoustic Bass Drum |
| 36 | C1 | Bass Drum 1 |
| 37 | C#1 | Side Stick |
| 38 | D1 | Acoustic Snare |
| 39 | Eb1 | Hand Clap |
| 40 | E1 | Electric Snare |
| 41 | F1 | Low Floor Tom |
| 42 | F#1 | Closed Hi Hat |
| 43 | G1 | High Floor Tom |
| 44 | Ab1 | Pedal Hi-Hat |
| 45 | A1 | Low Tom |
| 46 | Bb1 | Open Hi-Hat |
| 47 | B1 | Low-Mid Tom |
| 48 | C2 | Hi Mid Tom |
| 49 | C#2 | Crash Cymbal 1 |
| 50 | D2 | High Tom |
| 51 | Eb2 | Ride Cymbal 1 |
| 52 | E2 | Chinese Cymbal |
| 53 | F2 | Ride Bell |
| 54 | F#2 | Tambourine |
| 55 | G2 | Splash Cymbal |
| 56 | Ab2 | Cowbell |
| 57 | A2 | Crash Cymbal 2 |
| KEY | NOTE | SOUND |
|---|---|---|
| 58 | Bb2 | Vibraslap |
| 59 | B2 | Ride Cymbal 2 |
| 60 | C3 | Hi Bongo |
| 61 | C#3 | Low Bongo |
| 62 | D3 | Mute Hi Conga |
| 63 | Eb3 | Open Hi Conga |
| 64 | E3 | Low Conga |
| 65 | F3 | High Timbale |
| 66 | F#3 | Low Timbale |
| 67 | G3 | High Agogo |
| 68 | Ab3 | Low Agogo |
| 69 | A3 | Cabasa |
| 70 | Bb3 | Maracas |
| 71 | B3 | Short Whistle |
| 72 | C4 | Long Whistle |
| 73 | C#4 | Short Guiro |
| 74 | D4 | Long Guiro |
| 75 | Eb4 | Claves |
| 76 | E4 | Hi Wood Block |
| 77 | F4 | Low Wood Block |
| 78 | F#4 | Mute Cuica |
| 79 | G4 | Open Cuica |
| 80 | Ab4 | Mute Triangle |
| 81 | A4 | Open Triangle |
Ableton Drum Rack Mapping According to General Midi:
| High-Mid Tom (C2) | Crash (C#2) | High Tom (D2) | Ride (Eb2) |
| Pedal Hi-Hat (Ab1) | Low Tom (A1) | Open Hat (B#1) | Low-Mid Tom (B1) |
| Electric Snare (E1) | Low Floor Tom (F1) | Closed Hat (F#1) | High Floor Tom (G1) |
| Bass (C1) | Side Stick (C#1) | Acoustic Snare (D1) | Clap (Eb1) |
Velocity #
Every MIDI note also gets sent with a corresponding velocity message. If you strike a key hard, it’ll send a higher velocity value, soft, lower. If the controller doesn’t support this, typically the note will be sent with a velocity of 127 (the maximum value) on every note. There’s also a bit of strangeness where the note-off event (the release of a note) actually sends its own velocity as well. Typically, this is 0, though other values are possible.
Not all instruments/plugins/software will respond to velocity, and some may respond in different ways. A piano emulation for example may actually try to replicate the different ways piano keys sound when hit with more or less power, while a drum sampler may only vary the volume or ignore velocity entirely.
Aftertouch #
Aftertouch is a sort of continuous velocity message. It’s not nearly as commonly supported, but the idea is to send so that the pressure of your finger over time can change something about the sound. Unfortunately, aftertouch is usually shared by all the notes you’re holding at a given moment, and only the highest value (most pressure) is sent. Devices that send multiple aftertouch messages are significantly less common- this is partly because until MIDI 2.0 becomes more common, the only good way to do it is with MIDI Polyphonic Expression capable controllers, which send each note on a separate MIDI channel, and then abuse this to make each channel aftertouch message only be associated with a single note. This is a bit hacky, but has become a sort of bolted-on standard to MIDI, and so a lot of software (though far from all) supports it now. Probably the most recognizable MPE controller is the ROLI seboard, which I linked back in the Instruments chapter. MPE controllers tend to be on the very expensive side of things though.
CC’s #
MIDI Control Change messages are what they sound like. They’re used to represent turning knobs or moving sliders- controls. You can then move these knobs to control whatever you like, and with most DAWs you can record these movements to play them back or edit them after the fact later- just like with notes.
Generally, controls get mapped to whatever parameter you want using MIDI Learn. This is a feature in most software where you click the ‘Learn’ button, click the parameter you want to control, and then move the physical control you want to map it to. Then, click the ‘Learn’ button again to resume normal operation. Now that physical knob or slider or whatever will control the virtual knob/slider.
Typically, you’ll also be able to record and edit your adjustments of MIDI CC’s after the fact. This is usually done in the same place as all other automation in whatever software you’re using, and typically in the same area that you place clips of MIDI note data, in most software that will look something like this:

Because MIDI CC’s are only 7-bit (like the nearly the rest of MIDI) the resolution is trash and many programs will actually interpolate (morph) between values. This prevents knobs from feeling like they’re clicky with only so many positions and instead makes them behave more like you’d actually expect, though not all software does this.
There’s a few special ‘reserved’ CC’s, though often you can just override them to do whatever you want anyway. However, before we got to that list of reserved CC’s I want to take a small detour to understand just what the fuck an NRPN is.
NRPN stands for Non-Registered Parameter Number, and is a weird tidbit in the midi standard where some control messages may actually use two messages to send one value. This is because MIDI is, as previously mentioned, fucking old and only 7 bits. Well, if we use 7-bits of one message to represent the higher bits (Most Significant Bits or MSB) and 7-bits of another to represent the lower bits (Least Significant Bits or LSB) we can get much finer resolution messages. By going from only having 7 bits (that is seven 1’s and 0’s) to represent our number to 14 bits, we go from only being able to represent numbers from 0 to 127 all the way to 0 to 16383. This makes knobs go from feeling like you’re snapping to discrete values to feeling smooth.
Unfortunately, NRPN support is super fucked up and support for it varies pretty wildly from program to program, and few controllers actually support it. Still, it’s worth mentioning as until MIDI 2.0 picks up steam, we’re stuck dealing with using whatever hacks we can to get more resolution out of things. So, now, in this list of ‘reserved’ MIDI CC’s you’ll see some CC’s have a +nn next to them, for programs that support NRPNs, this the CC’s that would be used in conjunction with the normal one to provide more resolution.
| CC | Name | Description |
|---|---|---|
| 1 (+33) | Mod Wheel | One of the two wheels/touch strips on many keyboard controllers |
| 7 (+39) | Volume | Sometimes this is per-track, sometimes it’s the master volume |
| 8 or 10 (+40 or 42) | Pan | 0=Left, 127=Right, 64=Center |
| 64 | Sustain Pedal | When high (>64) hold all notes played until the CC goes low. Usually a pedal for piano |
| 65, 66, 67, 68 | Portamento, Sostenuto, Soft, Legato | These CC’s aren’t often supported, but provide the other pedal controls that some MIDI keyboards will have as foot pedals. Very few VSTs will respond to these correctly. |
| 120 | Mute | Channel Mute, but sometimes acts as master mute, depends on implimentation |
| 123 | All Off | Force all MIDI notes OFF, not always supported |
You’ll notice that all the extra resolution CC’s (these provide the LSB) are exactly 32 higher than the original. In fact, depending on the software you may be able to corolate any of the first 32 CCs to there +32 counterpart, 1 with 33, 2 with 34, and so on. Again, this is all relatively uncommon, but you should be aware of it.
Of note, most software represents interal states with more than 7-bits of resolution, so moving the software knob will often let you get to more exact values if you need to get something between to ‘clicks’ of the knob turn. Also, usually your DAWs internal automation routing will have more than 7-bits of resolution too, so if you make a curve or ramp for a software knob to turn itself, it won’t sound like it’s clicking to 127 discrete values.
CC Feedback? #
MIDI CC’s are, typically, a one-way communication. For most controllers, this is fine, as the knobs aren’t motorized and can’t move to reflect new values if you change a value with your mouse or automation effects the value. Though, this isn’t always true - Some controllers do actually have a ring of LEDs around knobs, motorized faders, or lights above the keys. In these cases, the device needs to both send and receive data. Not all software will support controllers that do this, but most will. It may be referred to as different things, for example, in Ableton Live if you enable ‘Remote’ in the MIDI settings of an device’s input (output from Ableton) connection, it will send value updates to the controller so that parameters can be shown like this (see this Ableton help page for more info) in VCV stoermelder’s MIDI-CAT is the only way I know of to do this kind of feedback.
Sustain #
In the above table, the Sustain on CC 64 is listed. This CC is particularly important as when it’s high, notes will continue to play as if the note off message never happened until it is let go. This is really fun to play with.
If you’re using a pino VST, there’s at least a small chance that CC’s 65-68 will work as intended to emulate the other pedals on a real piano as well.
Sometimes the sustain CC is used as a control that is assumed to be on a pedal and would only be wanted as a momentary action, such as a repeated striking of the note or enabling a very heavy effect. This is relatively common in music plugins that emulate other instruments. For example, in a guitar emulation, the sustain pedal may act as a palm mute switch instead.
On most physical controllers that offer a sustain pedal, it is attached via a 1/4" TS cable on the back. You can get sustain pedals for pretty cheap that work with this both ‘piano style’ that look like traditional piano pedals, and synth style, that are flat switches. I’ve had better luck with the latter, as my Korg PS-1 Footswitch (Amazon) has held up rather well.
Pitchbend #
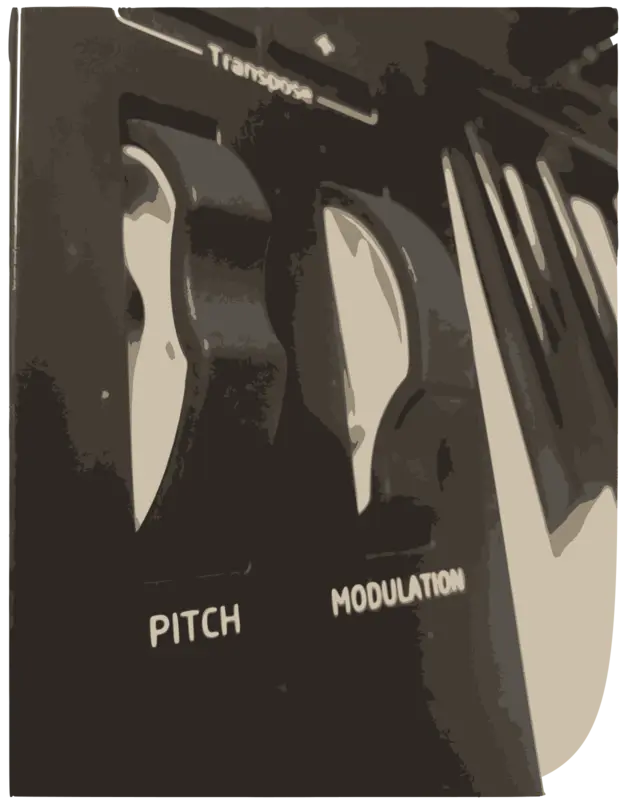
Pitchbend is inherently a simple idea, play a note, move this wheel and the note will ‘bend’ in pitch up or down, similar to a whammy bar on a guitar. There are some things you should know about how it works in MIDI though:
Throughout this page I’ve been referencing MIDI typically only being 7-bit. MIDI pitch bend is the main reason for this “typically” as it is a 14 bit value, so it ranges from 0 to 16383 instead of the 0 to 127 of everything else. This is necessary as pitch bend is used for, well, bending the pitch of a note. If it only had 127 values, you’d be able to hear as it snapped to particular pitches. The pitch bend can go both ways, so a value of 8192 (half of 16383) represents no pitch bend. Confusingly, the range of the pitch bend varies by the software or hardware you’re sending the pitch bend message too. The ‘default’ range is ±2 semitones; however, I’ve found that both ±12 semitones (1 octave up, and 1 octave down) as well as ±24 semitones are reasonably common as well.
While the pitchbend MIDI message supports 14bits of resolution, may MIDI controllers will not actually read in 14 bits of resolution, so they will feel less smooth than the standard actually allows for. If you like to play with pitchbend a lot, this may be something you want to research before buying a MIDI controller.
Clock & Transport #
In the last chapter, Sequencing & MIDI, clocks were shown briefly. Basically, the idea is to send the tempo around to every other device/module/plugin/etc. that needs it so that everything can stay in sync. It’s like the ‘click’ the drummer feels internally that the rest of the band plays to.
Generally, this clock is displayed as your tempo, in Beats Per Minute, or BPM. There is some other subtle things you need to be aware of though. The biggest being Swing: most software will let you set in an amount of swing which makes the beat go duh duh-duh, duh duh-duh, almost as if the drummer is always a bit late on one note so rushes to catch up, but does this consistently.
A clock driving a step sequencer in VCV Rack
Clock #
Imagine you’re back in the ’80s designing the MIDI protocol. How would you impliment clocking? Would you send every device one message that is the tempo, followed by maybe an extra message for swing, or other different parameters? That seems pretty reasonable, though does fail if we want smooth transistions in tempo, and you’ll still need to compenstate for offsets in timing from signal latency.
What you probably didn’t think is “Let’s just send a fuck load of clock ticks down the wire”.
This is exactly what MIDI clocking does. By default, it’s 24 pulses per quarter note (ppqn), and this is used to distribute clock around. This is a very, very stupid design. Yes, it’s the 80’s and even the idea of making music with computers - computers which had heavy hardware contraints mind you - was new, but come on, what the fuck?!
Anyway, here we are. So, what are the implications of this:
- MIDI clock does not have built in time-correction. If there’s a 2ms delay coming out your computer, a 2ms delay for the device to process the midi input, and a 5ms delay on the audio from the device back into your recording interface, you’ll need to offset the input by -7ms. This is extraordianly awkward, as the device now needs to know future inputs.
- MIDI clock can have stability issues. If the tempo is 120BPM, that’s 2 notes a second, so at 24ppqn, 48 pulses a second, which comes out to be 1 pulse every 20.833 milliseconds. This will absolutely varry a bit, if we assume the clock varries even by ±1 millisecond that will thow us off to anywhere from 45.8 to 50.4 pulses a second, which equates to about 114.5 to 126.1 BPM. That’s a lot of varience for a pretty minor hickup in our clock signal. Even if it averages out, there’s still a good chance some of the beats will hit at weird times, causing phasing issues. See this video from Expert Sleepers (YouTube) to see how this actually looks.
Just be aware this may cause you problems and that none of the solutions to the problem are any fun. Also, MIDI Through only makes the problem worse- more on that in a bit
Transport & MMC #
MIDI Machine Control or MMC is the part of the MIDI spec that defines the ability for devices to send and receive transport control messages. These include play, pause, stop, record start and stop, as well as fast-forward and rewind among others you can see In the Wikipedia article. Technically, these are sent as SysEx messages, which I’ll touch on in a bit, but unlike the broader use of SysEx messages, these messages are pretty universally supported.
Midi Time Code #
MIDI Time Code or MTC is what is used for devices to talk to each other and say what part of a song their at. Say you have a DAW playing most of your tracks and a drum machine taking care of drums, that is supposed to play different patterns at different times. You could send a midi note or program change or other message to change pattern if the device supports it, but having it change the pattern based on time code works a bit better. For example, if there’s a long section playing the same pattern and you seek to it, you may not end up triggering that special message to tell it to change. With MTC the drum machine could say “Oh, We’re 20 seconds in, I need to play the drums for this section now!” and, ideally, even catch up halfway though the pattern, so the drum beat doesn’t get off as you seek around to a different place in the song you’re working on.
So, how does it work? Get ready for a wild ride.

MTC is actually based on SMPTE Timecode, so what’s that? SMPTE stands for Society of Motion Picture and Television Engineers, so SMPTE Timecode is, unsurprisingly, for video time codes. In video, each picture shown is a frame, and there were multiple standards for how many frames should appear per second- the FPS. Unlike in gaming, this is a fixed, standard number for video except that the standard varied by region for older, analog television. As such, MIDI clock is actually based on ‘frames per second’ and there are multiple competing standards, but let’s work our way to that:
If you’ve ever used old game consoles (like the NES) with the composite video out, you may have encountered some of these standards, namely NTSC and PAL. In North America NTSC is standard, while across the pond you’d find PAL (and SECAM, but that isn’t relevant here). The biggest difference between NTSC and PAL is the frame rate -
But before we get to frame rate, we need to talk power line frequency - In most of North America the mains power from the wall is 60Hz, and pretty much everywhere else it’s 50Hz. This is relevant, as NTSC and PAL video each had a frame rate that was half of the power line frequency: 30Hz for NTSC and 25Hz for PAL.
So, now we’re almost there, there’s actually yet another complication, the time code could also be 24Hz (to match the 24FPS of film as was standard in theaters) or 29.97Hz because NTSC had to be slowed this slight amount to accommodate adding color to otherwise black and white video.
Alright, so all of that is to say, MIDI timecode is based on one of four frame rates despite not actually having frames: 24, 25, 29.97, or 30Hz.
Things only get weirder though, as technically, MIDI Timecode is based on the time of day and it repeats after 24 hours, so there’s a hard limit on tracks to 24 hours (not that you’d probably ever hit this anyway).
Not yet satisfied with how much of a mess this is, MIDI timecode is actually broken into 8, 4-bit sized pieces that are then sent on every \(\frac{1}{4}\) frame, but that means to send the full 32 bits for one time code, 2 frames actually have to pass, so the resolution is only to every 2 frames, or 12, 12.5, 14.985, or 15Hz depending on the video standard used. This effectively means when seeking you’re limited to somewhere between 0.0833 and .0667 seconds jumps.
Program Change #
Program change messages are generally used for switching between presets on a device. They’re also used by General MIDI with some default settings for instruments to belong to a certain channel, which allows some media players to play back MIDI files with the correct instrument assigned per track, albeit these default instruments usually sound quite bad. This isn’t really used anymore, though it might be of interest if you’re trying to write music that’s supposed to sound like it’s from a 90’s video game.
Generally though, you’ll just use program change messages to alternate between presets of a hardware or software device. Keep in mind, these changes are usually abrupt, so if you only want to adjust two knobs or something, you may be better off using CC’s to smoothly transition from one state to the other.
SysEX #
System Exclusive Messages- typically just called “SysEx”. The name sorta says it all, these are messages that are specific to a given device (or software). It’s often used for firmware updates, though may also be used for configuration, uploading presets or sounds, and even just sending control messages on some older hardware. Usually, if your device updates via SysEx it will have a nice GUI updater, but if that fails you may have to use something else. On Windows, MIDI-OX is complicated, but probably your best bet. If you want to send SysEX from your DAW for live control, it may be complicated. Ableton supports it, but only using M4L, which is expensive. For other DAWS, YMMV. Renoise, for example, has decent support with 3rd party utilities like Guru providing hardware mappings for some popular synths. Meanwhile, Bitwig and FL Studio can’t send SysEx at all.
MIDI’s Physical Connections & Throughput #
So, there are multiple physical connections that MIDI data can run though- USB, TRS, and 5-pin DIN.

MIDI over USB #
MIDI can run over just about any USB connection you’re used to- micro, mini, USB-C, and often that chonky square one that printers still use. There are four things you should know about USB midi:
- Typically it’s two way. The usb connection will provide both MIDI to and from the connected device.
- USB devices have the concept of Host and Device. This means that with USB MIDI devices you can run into a situation where you may want to connect something that expects to have a USB device (like a keyboard) attached to it, but you want to connect a host (like your computer) and use it as a device. This may requrie you use an adapter.
- USB MIDI is much faster than the other MIDI standards
- USB MIDI can often lead to ground loop problems or noise in connected devices. You may be able to fix this by either using “Hum Destroyers” (Ground loop isolators) on the audio connections or using a USB power isolator on the USB connection. These don’t always work though.
5-Pin DIN #
This is the old school way that MIDI works.
- The connection is optoisolated this means that ground isn’t sent over the cable, preventing ground loops. This may be a fix if a device offers both USB and 5-Pin DIN midi.
- Despite being a 5-pin cable, only 3 pins are used
- The cable is not bidirectional- if the device you’re connecting needs to send data to something and get data back, you’ll need two cables
TRS-A & TRS-B & TS? #
- There are 3 conflicting MIDI over normal-audio-jack “standards”. Fortunately, TRS-A (as shown in the figure above) has been made a real standard now and should be used exclusively on newer equipment. TRS-B and TS only devices are still out there though, so be sure to check
- Like 5-Pin DIN MIDI, MIDI over TRS is optoisolated, so you shouldn’t have to worry about ground loops
- TRS MIDI is also often used on guitar pedals, though it shouldn’t be confused with guitar pedal expression input or control voltage, which are both analog communication not digital like MIDI
- There are plenty of adapters out there to go between TRS MIDI and 5-Pin DIN, but again, make sure it’s the right TRS Standard (A/B)
- The cable is not bidirectional- if the device you’re connecting needs to send data to something and get data back, you’ll need two cables
MIDI Through #
graph LR A[Controller] --> B(Device 1) A --> C(Device 2) A --> D(Device 3)
graph LR A[Controller] --> B(Device 1) B --> C(Device 2) C --> D(Device 3)
MIDI though is a feature where there’s an extra MIDI port that just passes the input data along. Say you have your computer with one USB→5-Pin DIN MIDI adapter so you send that data first to a polyphonic synth, listening on channel 1, for playing chords and that synth has a midi though so you can connect that to the input of your next device, say a drum machine, and have that react to inputs on channel 2, and so on. This just allows for a much cleaner cable setup.

MIDI though may or may not actually pass the output of the device too, so if that synth keyboard is acting as an input device to the computer (not playing sound as notes are sent to it from the computer) then it may or may not put those notes its playing out the midi-though, it just depends on the device. Here, I’ve shown a setup where the first device does have an input MIDI connection sending data to the computer, with a second connection. Most USB to 5-Pin DIN MIDI adapters will have one 5-Pin DIN Input and one 5-Pin DIN output. Meanwhile, many MIDI sound-making-device (synths, drum machines, etc) will only have an input and maybe a though, and many MIDI controllers (keyboards etc. that don’t make their own sounds) will only have a MIDI output, no input. What this means is often, if you’re going to be using MIDI though, you’ll want to have a device that you want acting as both an input and output first in your chain, followed by devices that only need MIDI Input.
Confused?
Alright, so, because 5-Pin DIN and TRS MIDI are both one way, the though acts only as an output, meaning you can chain devices but those devices will only receive data, not send it. Essentially, the main use of this is getting one USB→MIDI adapter to sequence many sound-making devices, and usually sharing clock among all of them.
The big other use of MIDI though is when you’ve got a device doing MIDI over USB, but the device has a MIDI output or though such that the device can act as USB →5-Pin Din/TRS MIDI adapter for another piece of gear.
In my setup I have a MIDI controller pedal that allows me to send whatever MIDI messages I want with my feet (handy when holding a guitar) and it is connected via USB to my computer, so that I can control any software effects I want to run my guitar though. This same pedal also has a 5-Pin DIN output, that will both output messages it generates and messages it receives though USB (acting as a though) and I’m sending that signal up to a multi-effect guitar pedal. This means I can use the controller pedal as a controller for both software effects and the hardware multieffect pedal simultaneously, but even better, it means I can send data from my software, though the controller pedal, and out to the multi-effect pedal. This makes for an extraordinarily flexible setup. It’s really nice for sending CC’s to the hardware pedal and software simultaneously, recording the CC automation, then playing it back if I want to do a second take or multi-track.
There is one final issue you may have with MIDI though that you should be aware of- as previously mentioned, some devices will just pass the MIDI input to the Though unaffected, even if that device can add it’s own MIDI data, others will add on their own output. In the former case, some devices will literally just connect the in to the though electrically, resulting in no delay, while some will buffer the midi signal digitally and output it again, this ends up adding a very slight delay. In the latter case, this delay is almost gaurenteed. The delay is really a concern as it ends up affecting the MIDI clock signal as well, which means the clocking can get more delayed with each MIDI though. This is typically not a problem in reality, as the effects are usually not perceptible, but you should still be aware of it.
Virtual MIDI Ports #
Virtual MIDI ports are quite handy, as they allow you to route MIDI messages between two software programs on your computer, mix multiple midi devices together, etc.
Arch Linux (should work in other distros too): Make a file called snd-seq-dummp.conf in /etc/modprobe.d/ and put options snd-seq-dummy ports=4 in it. You may also need to use the application a2jmidid with the -e flag to route MIDI though Jack Audio applications, though most programs can use Jack for audio and ALSA for MIDI. Restart, and now you should have more virtual ports. You can check by looking though /dev for more midi devices. There’s a lot of options here, as with all things Linux, so you should probably read some Wiki Pages. Depending on the complexity of what you’re trying to setup, mididings may be of use to you as well.
Windows: use Loop MIDI by Tobias Erichsen
MAC: Built in with Audio MIDI Setup, open that and goto ‘IAC Driver’ then check ‘Device is Online’
Bandwidth #
One thing you need to be aware of that a combonation of which of these physical connections you’re using and what the devices you’re using have for processing power will determine the maximum rate that you can push MIDI messages to a given device.
If you’re just playing the keyboard, you have nothing to worry about. If you’re playing the keyboard, twisting a few knobs, using the pitch-wheel, and sending clock data you might start pushing it. If you’d like to use MIDI data to send an LFO or an envelope, you might find that things just don’t work. If you imagine that you want a nice 10Hz sine wave MIDI CC LFO that uses the full 0-127 range, that means you’d need to send 128*2*10 = 2560 midi messages a second, each message needs 3 bytes, one to say the message is a CC, one to specify which CC it is, and one to send the actual data, a byte is 8 bits, so this means 24bits per message so we have 2560*24 bits per second = 61,440 bits per second. By default, the ’lowest spec’ default 5-pin DIN MIDI only supports 31,250 bits per second, we’ve already asked for about double that just by sending one LFO. Fortunately, USB Midi generally allows for significantly more data to pushed down the pipe, with some usb MIDI devices even requiring MIDI 3.0 which means these devices have a reason to need more than the ~480,000,000 bits per second USB 2.0 can do. This isn’t your Grandma’s MIDI.
Eurorack MIDI⇄CV #
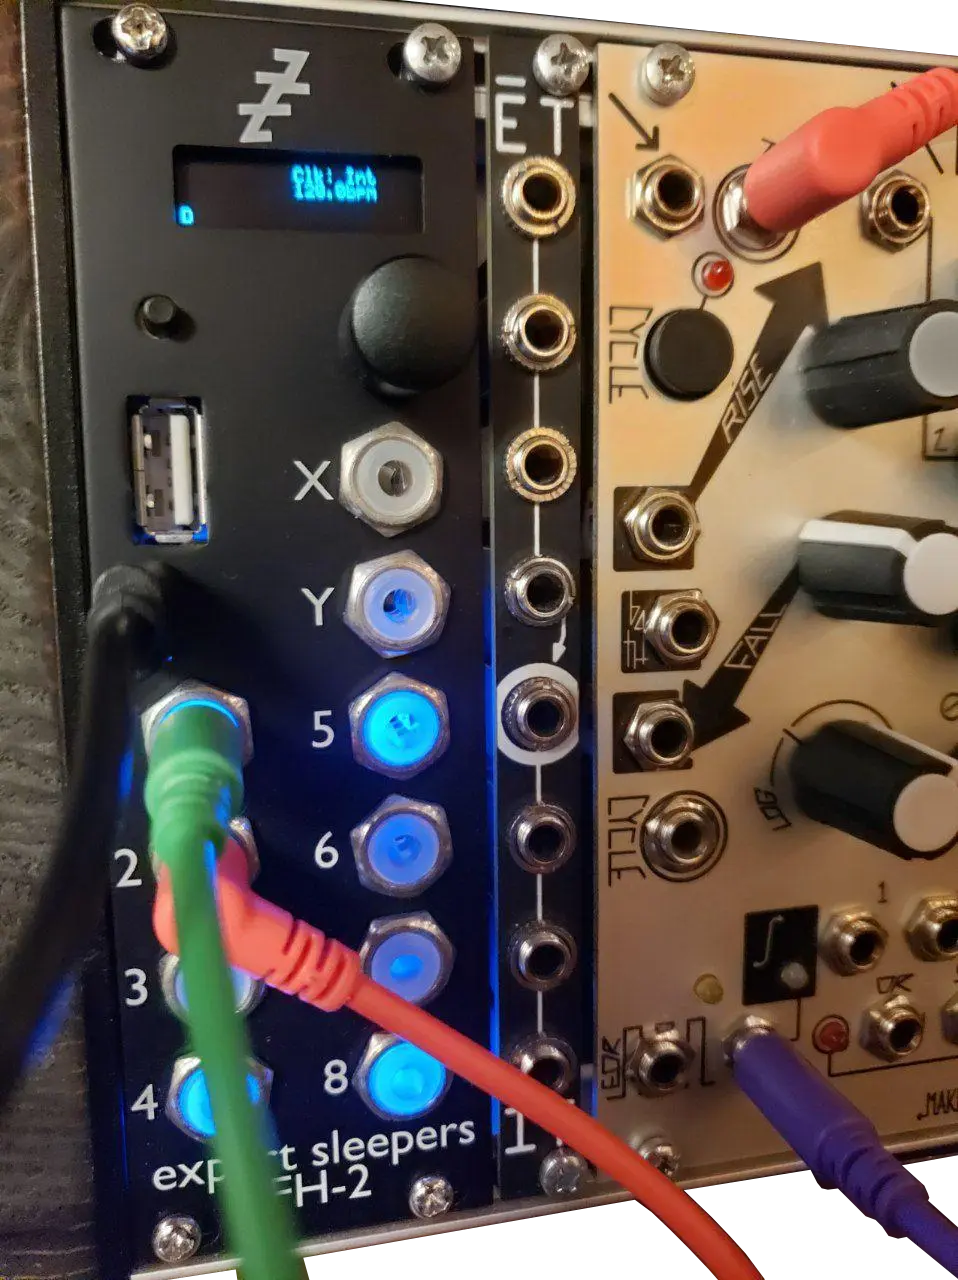
The Expert Sleepers FH-2
One common place to run into issues is with MIDI⇄CV.
Doing MIDI to CV with an MPE controller is particularly difficult, so you should expect to need a nicer adapter that explicitly says it will work. Going the other way around, CV to MIDI, is even more complicated due to these bandwidth considerations. Even with the bandwidth of USB, CV→MIDI adapters will still top out at pretty slow LFOs (you absolutely will never be able to do CV→MIDI at audio rate!) and, if they’re really slamming the USB controller or OS level virtual MIDI devices, they can cause more extreme issues- lots of software crashing ahead for those that go this route.
That said, it does seem some devices are more user friendly than others. While my experience with Expert Sleepers FH-2 for CV→MIDI has been a headache, it appears the Befaco CV Thing and VCMC work much more smoothly. I suspect this largely comes down how much the MIDI output bandwidth is being limited.
The FH-2 appears to just try to throw as much data down the pipe as it can muster, while the Befaco modules seem to apply sane rate limiting- but that also means that they will not feel as smooth or support as fast of input LFOs.
If you can, you’re probably better off either using something like the ExpertSleepers ES-8, ES-9, or ES-3+ES-6 to take audio in directly and using software that supports using audio as modulation (some workarounds may be necessary, such as using envelope followers) or using one of the very few modules that impliment OSC (more on that later). Honestly though, doing CV→MIDI is a bit of a fools errand, especially for modulation (CCs). The only real practical use is if you really want to sequence something that doesn’t have a CV input with a eurorack sequencer, otherwise you’re better off just finding dedicated MIDI equipment that does the kind of input you want.
Over Network #
Look, I’m not going to say you can’t do wireless or networked midi. You definitely can. It’s just that there’s alway something that goes wrong. The ’normal’ way to do it is using RTP MIDI. This should work cross platform:
- Windows, use rtpMIDI by Tobias Erichsen
- Mac, use the built in network-MIDI tools
- Linux, use RaveloxMIDI
Sometimes this works 100% perfectly, other times it’s a fucking nightmare. Best of luck.
MIDI 2.0 #
MIDI 2.0 is the new spec that aims to be both backwards compatible with the MIDI as described up to this point, but fix all of the massive clusterfucks that have arisn over the years- providing higher bandwidth, bi-directional communication, higher resolution controls, native support for MPE-style devices, better clock syncronization, profiles based on use case, etc. Basically, it’s not a total shit storm like what we have now. Unfortunately, MIDI 1.0 isn’t going anywhere any time soon, mostly because there’s already such a huge backlog of supported hardware and it’s cheap to impliment. So, MIDI 2.0 is the future we will hopefully slowly creep into.
Open Sound Control #
I can’t belive it’s not MIDI!
OSC is an alternative to MIDI you’ll often see used when either higher resolution controls (more than the 0-127 of MIDI) or network control (using your phone as a control surface over WIFI, for example) is needed. Support is a bit all over the place, as a lot of major DAWs don’t have built in support but can work with 3rd party tools, but there are very few hardware synths and controllers that use it, making it mostly useful for software controller implimentions that provide touch-screen knobs and faders - like Touch OSC for mobile devices, speciality controllers like using the Leap Motion for sending control messages, or over-the network colaborative jamming - where each player can send signals that other players can use, each from their own laptop. There are various OSC Modules for VCV Rack.
Mackie Control / HUI #
Human User Interface Protocol (commonly abbreviated to HUI) is a proprietary MIDI communications protocol for interfacing between a hardware audio control surface and digital audio workstation (DAW) software. It was first created by Mackie and Digidesign in 1997 for use with Pro Tools, and is now part of the Mackie Control Universal (MCU) protocol.
So, MCU and HUI are technically different things, but they seem to be used interchangeably. But, what is it good for?
Mackie Control Universal (MCU) is a fustercluck of a non-standard developed by Mackie, a particular hardware manufacture, for one of their hardware controllers. While originally MCU was made for Apple’s Logic DAW, it eventually the control ‘standard’ found its way into other DAWs. It mostly provide a ‘universal’ mapping for common functions like mute, solo, track select, EQ and what not. It’s especially nice as MCU is 10bit (1024 values) and bidirectional - the controller can show the current volume or whatever on a screen easily- though it all still runs over MIDI, so devices using it mostly use USB MIDI. The specifics of how MCU works is sort of a nightmare to dig up, this thread is probably a good starting place should you have to look into it for some reason. The main take away is that HUI is used to provide this deeper integration into your DAW than normal MIDI provides alone, and that quite a few controllers now support it, for example ‘Launch’ series devices from Novation, the Studiologic Mixface, and Behringer X-Touch, just to name a few. Just ctrl+f on these pages for HUI or MCU and you’ll see it. Most of these controllers have a focus on what would traditionally be at a large mixing console- per track volume faders, pan, eq, and track selection (which track you want to arm for recording).
Ableton Link #
Alright everyone, syncronize your watches!
Ableton Link works in more than just Ableton, it’s a protocol for sending clock to multiple devices or software that makes synchronization relatively easy. It supports sending the clock and adding/subtracting an offset to correct for latency in whatever connection you’re using. It is not sent over MIDI or OSC or another existing music protocol. It’s its own thing that gets sent over the network. While some hardware has added support for Link, it’s still largely a software thing at the time of writing. There is even a link module for VCV Rack.
It is provided as a dual licensed standard, from the Link repo:
Ableton Link is dual licensed under GPLv2+ and a proprietary license. If you would like to incorporate Link into a proprietary software application, please contact link-devs@ableton.com.
MIDI Routing Hardware #
[TODO] Blookas MIDIhub, MRCC - MIDI Router Control Center, Multiclock, Teensy 4.1 based 8in/8out interface
Hacky Bullshit #
You Can Send MIDI over I2C if you Really Need To (Hackaday, DIYElectronicMusic)